

Making MP3’s with Linux Using Grip
Posted by Keith Elder | Posted in Linux, PC Software | Posted on 09-10-2000

If you are like me, you have started your MP3 collection and have converted just about every CD you own into your very own MP3 file. If not, then you are reading this for one of two reasons. 1. you want to know how the other side lives since you are coming from a Windows environment. 2. You asked someone and they sent you here. 3. You just installed Linux and are ready to build your own MP3’s. Whatever the reason, we are not going to get into debates about Napster just very simply turning your audio CD’s into an MP3 the easiest way.
The Program
Grip is a gtk-based cd-player and cd-ripper. It has the ripping capabilities of cdparanoia builtin, but can also use external rippers (such as cdda2wav). It also provides an automated frontend for MP3 encoders, letting you take a disc and transform it easily straight into MP3s. The CDDB protocol is supported for retrieving track information from disc database servers. Grip works with DigitalDJ to provide a unified “computerized” version of your music collection. GCD is the cd-player only version of Grip (for those who aren’t interested in track ripping/encoding). (taken from Grip’s homepage).
Explain…
Basically all music is put onto an audio CD. The music on the audio CD is not compressed in any way shape or fashion, it is simply a whole bunch of 0’s and 1’s stored into a file. These “files” as us computer geeks refer to them are called “tracks”. So basically the “track” is the actual song. The problem is we have to get that track/file off the CD where it is stored and onto our hard drive. Once there, we can then comress the file and the final result is a MP3 file. So, in a nutshell, we are going to take this “track” and convert that to a .wav file (something computers call sound files) and then run the .wav file through a program called an “encoder” which then encodes our huge .wav file into a much smaller, more portable file called a .MP3 file. I know, I’m a genius.
Ok, how do we do it?
First of course we have to install Grip. The Linux Tricks on ZorKa.Com are not meant to be a complete howto but a quick “give me the facts” so the install process will not be covered. However, with that said, if you don’t already have it installed simply go to the link provided above and download the rpm or if you have debian linux “apt-get install grip” will do the trick. After installed you will simply need to run “grip -d ” where ???? is your cdrom device (hdb, scd1, scd0, hdc, hdd, etc). Grip has to be told where the actual cdrom device is located. After you start your version of grip you will want to then select the “Config” button and setup how and which “encoders and decoders” you selected to install. Notice that Grip can use a lot or practically all of the encoders/decoders that are written currently for Linux. The two main ones were are going to focus on is “Rip” and “MP3”. The “rip” is used to describe the process of getting the “track” off of the CD and into a “file” onto the hard drive. The “MP3” is the process of encoding the “file” or .wav file as it is called, into a MP3 file. Two things to note: 1. Be sure that you include the full path to your CD ripper and your MP3 encoder. 2. Make sure the one you choose is installed on your system.
Let’s Rip and Encode!
From here on out the process is very simple. Insert an Audio CD into your CDROM of choice and start Grip. An opening screen shot will look like this:
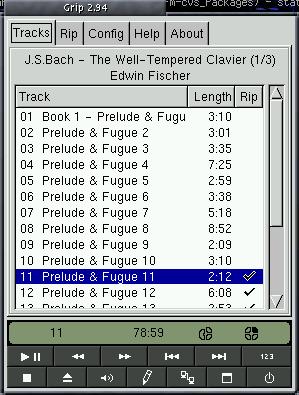
Notice that magically Grip knew the name of our Audio CD and also named all of the files/tracks listed on the CD. How did it do that? Well, if you were connected to the Internet when you launched Grip, Grip actually went out to the CDDB web site and looked it up for you! This allows Grip to automatically name the files for you when it goes to rip and encode the files! You will also notice at the very bottom of the picture there are some checks beside the tracks at the end. These files are the ones selected to be turned into MP3s. By pressing the “RIP” button on this screen we can automatically select all files on the CD. Next, we simply want to takes these files and turn them into MP3s. We do this by very simply clicking on “RIP” in the top tab section and pressing “Rip+Encode”. Grip will then start to rip the tracks from the audio CD and put them into a directory on the hard drive (this is setup in the config section when you select your ripper).

The above screen shot shows the process of Grip actually ripping and encoding an Audio CD. Notice that we are actually ripping and encoding at the same time and are not really doing anything special to make this happen. This is the real beauty of Grip. Easy, powerful, and smart enough for the average bear.
Conclusion
Ease of use, flexibilty, and built on Linux, what more could anyone ask for?
Great story, thanks. A rare web jewel:)Always search the web for smth interesting, including cool music <<a href=”http://ipod-mp3.org”/.html>ipod music download is a site where one can compile perfect playlists. A cushy spot for a music addict!