

How To Add Feedburner FeedFlare to Your SubText Blog
Posted by Keith Elder | Posted in .Net, Blog Updates, Programming | Posted on 07-01-2007
I started using FeedBurner.Com to power the RSS feeds for my blog and I am quite happy in doing so. I like the stats they provide and the guidance they provide on various tweaks to the feed without having to re-code anything. One of the items I added to the RSS feed and to the site is FeedFlare. FeedFlare places a simple footer at the bottom of each entry which allows people to distribute the entry to other sites or to inform other users of an entry.
Step 1: Configure your FeedBurner account for your blog
This may seem pretty obvious, but at the risk of someone being confused in order to do this, you have to create a FeedBurner account. The cost is free. Once you create an account and link up your feed which points to your real RSS feed on your site, configure it. Select your blog via the control panel and click on the Optimize tab. In the left menu select “FeedFlare” and configure the options you want.
There are two options: Feed and Site. By placing a check in one column or another will determine where the FeedFlare shows up. By choosing the “Feed” option, it will place the particular flare chosen at the bottom of your feed as seen here from RSS Bandit.
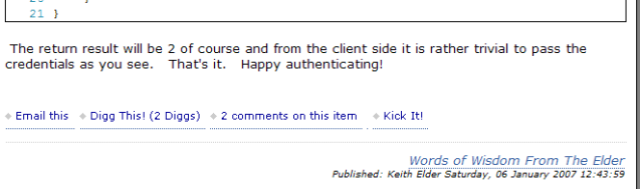
Choosing the “Site” option will display the chosen flares in your web site next to each item as seen here:
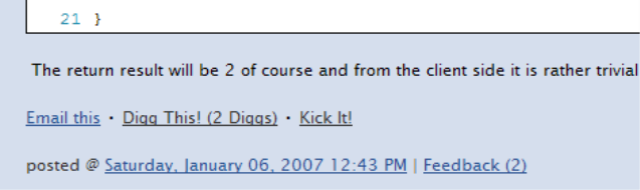
Step 2: Add any custom flares to FeedBurner
Once you are done configuring which built-in flare options you may want to add other flares. In the FeedBurner FeedFlare section there is documentation on how to add additional flare items so I will not cover it in detail but I will give you a quick sample on how to add a flare for http://www.dotnetkicks.com. Essentially you create an XML file which is uploaded to a web server. Here is the XML to add the flare as seen above for Kick It!
1 <FeedFlareUnit>
2 <Catalog>
3 <Title>Kick It!</Title>
4 <Description>Submit this post to DotNetKicks.Com</Description>
5 </Catalog>
6 <FeedFlare>
7 <Text>Kick It!</Text>
8 <Link href=”http://www.dotnetkicks.com/submit/?url=${link}”/>
9 </FeedFlare>
10 </FeedFlareUnit>
If you would like to use this particular one it is available here: http://keithelder.net/feedflare/KickIt.xml
Step 3: Modify SubText.Web.Skins.YourSkinName.Controls.Day.ascx control
I did some searching and couldn’t find any examples on where to place the script needed to insert the feed flare under each entry. I had to dig into the code a bit to find which variable was needed to get access to the URL of each entry from within the template. And I had to find the template.
The control we are going to modify is the Day.ascx control which is located in the Skins/YourSkinName/Controls directory. The variable that we need to place in our user control is “FullQualifiedUrl”. Since each item on the home page is printed using a Repeater we have to use the DataBinder.Eval to get each item’s FullyQualifiedUrl property. Here is the sample code you need to place in your Day.ascx user control. Don’t forget to modify the one associated with your skin and replace the word “yourname” with your appropriate FeedBurner name.
<div>
<script src=”http://feeds.feedburner.com/~s/yourname?i=<%# DataBinder.Eval(Container.DataItem, “FullyQualifiedUrl”) %>“ type=”text/javascript” charset=”utf-8″></script>
</div>
Once you have this placed in your template where you want it, upload your newly modified template to your web site overwriting the existing one. You only need to copy this one file. Reload your home page and your new flare should appear.
Very clear tutorial, i’ll try it asap in my dummy blog. Thanks.
gooood tutorial 😀 thx
Good tutorial how to add FeedFlare. I’ve been looking for this tips since I didn’t know yet what FeedFlare stands for. Your post open my eyes about this necessary simple tool. Thanks
I solved that problem last night at my site. ;~)
I realize this is an older post, but do you know how to add the flair to the individual post page. In my skin it is “ViewPost.ascx”. Since it isn’t using a repeater the syntax is different.
Muchas gracias.
Blog statistics with FeedBurner and Subtext
How Many Pieces of Flare are you Wearing?
Very cool Jon. BTW, it appears you have a ; in the KickIt! link on the flare on your blog. If you remove that, then the title goes through to DotNetKicks.Com.
To take what you did a step further, you can do this in the Link for the Flare as well:
http://www.dotnetkicks.com/kick/?url=${link}&title=${title}&description=${description}
That may be a little harder to parse but it does work.
-The Elder
I submitted a flare unit to DotNetKicks, which is available here:
http://static.dotnetkicks.com/tools/feedflare/kickitflare.xml
That lets you skip Step 2 if you’d like.
Great walkthrough!
Have no fear, I will be at the one in Janurary! As well as the LoneFlounder.
Hey keith we miss you at the last few lan parties it’s not the same without you. You should fly in sometime just for the JAN LAN.
So this is basically an RSS feed mirror. I knew this day would come.
You’ve been kicked (a good thing) – Trackback from DotNetKicks.com