

Installing Ubuntu Linux – Is It As Perfect As They Say?
Posted by Keith Elder | Posted in Linux | Posted on 08-07-2008
It has probably been four years since I last installed Linux from scratch. It isn’t that I haven’t touched a Linux command prompt or system in four years, it just that all of my installs are on my servers which just get updates applied. I decided to install Ubuntu Linux the other morning on an older Dell laptop I have replacing Windows. All this laptop is used for is surfing the web around the house. It lives next to my man chair (recliner) in the living room. The purpose of this exercise was twofold. From a usability point of view I wanted to see how easy the install of Linux had gotten and document my experience. And two I know there are a lot of people that have never even attempted to install Linux and I hope this helps those people at least play around. I will probably also use this install as a basis for some future topics as well as learning some new languages. Thus, you’ll probably see some new material coming out down the road.
The version of Ubuntu I downloaded was 8.04.1. After installing Ubuntu on my Dell I wanted to capture the install experience so I created a virtual machine using VMware Workstation and did another install. After getting presented with the initial boot screen I started capturing screen shots. Here is a walk through of installing Ubuntu along with some, man, that was cool, or wow that was stupid moments.
Installing Ubuntu
Step 0
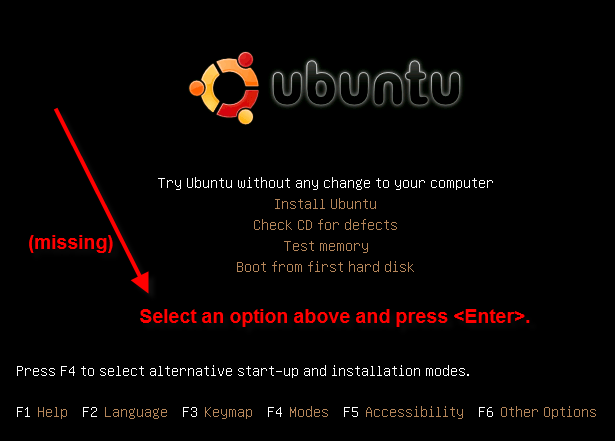
The very first screen a user is presented with when installing Ubuntu is the language screen. I’ll point out this screen doesn’t tell a user anything to do. I guess we are all suppose to know to press enter.

After selecting a language you are brought to this screen. Again it is missing that finer touch of UI polish by not telling the user what to do. The text in red is what I put in using Snagit so don’t think that was already there. I put it in to point out what was missing. I wanted to do an install so I pressed the down arrow on the keyboard (again not mentioned in the screen) and pressed enter.
Am I being picky? Not really. I can tell you right now any average computer user would question what to do next at this point.
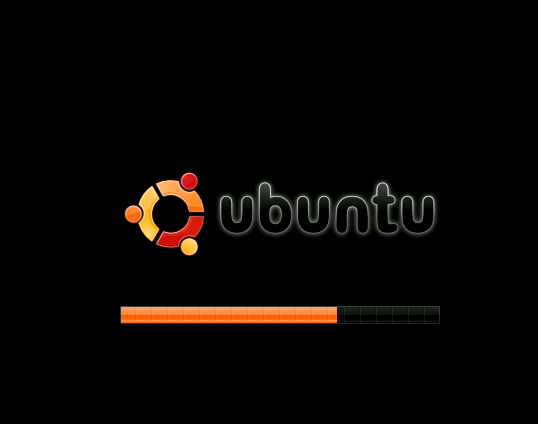
The next screen, while aesthetically pleasing, doesn’t tell me anything that is going on. What is my computer doing right now? Is it formatting my hard drive or what? This screen needs something to indicate to the user what the program is doing. I’m guessing it is loading the kernel in the background. This is much more pleasing to view than the kernel spit message after message but it still needs some type of interaction with the user.
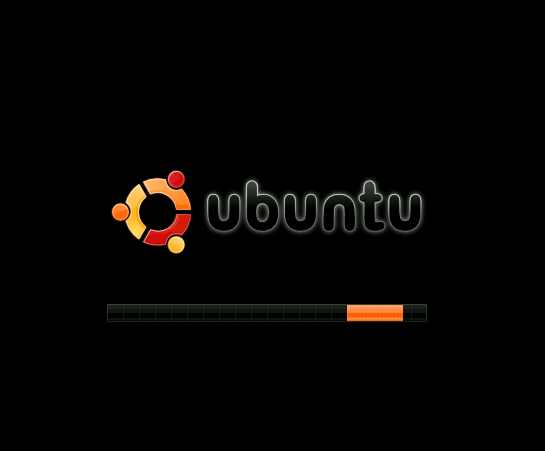
Knowing Linux the way I do I am sure this screen is loading necessary services Linux needs to load. Again, there is nothing to tell the user what is going on. Think about this for a minute. What if a user had to call into a support line and tell someone on the other end their computer locked up installing Linux? There are two screens that look very similar in nature. How would that be diagnosed?
Pretty. I dig the background of a penguin that looked like it got shot with a 12 gauge repeatedly. Seriously I like it. At this point we are in XWindows and we are going to start using the mouse to configure and setup the system. Linux has been moving to GUI based installers for years and it is nice to see some extra polish at this point, even if it is just the background.

Step 1
Thus far I have had to press enter to select a language and then enter to kick off the installer. If you recall, the first thing it asked me for was to select my language. Well guess what? It is going to ask AGAIN! Why, I have no idea since I had already selected it earlier during step 0. It looks like this would have already been done for me. There is also something on this screen that bugged me. I’m not really sure why but the word “Forward” in the bottom right is the name of the button to move through the setup process. This just hit me as absolutely weird. It is like the developers are trying to be so different as to not put the word “Next->” there that it looses the meaning. Sorry guys I just don’t get that. When you tell me I am in step 1 of 7, I immediately don’t think of the word “Forward” to go to the forward step, I mean next step. See, it doesn’t even make sense when trying to explain it. This is yet another example of developers not calling a kettle a kettle ( see past forrest gump article).

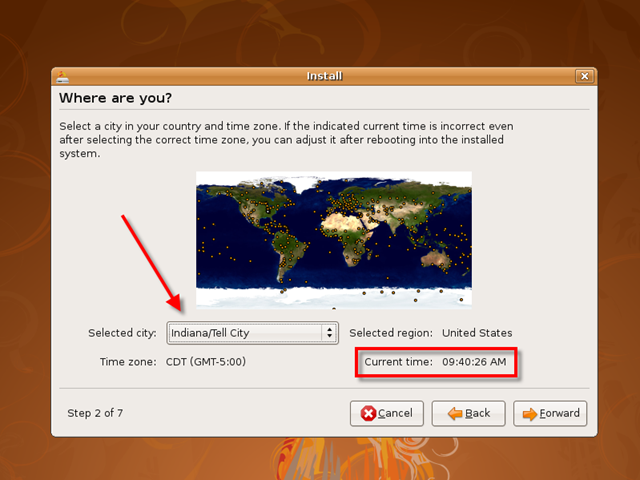
Step 2
This is the worst screen to deal with in the entire setup. This screen has been around for awhile and I didn’t like it then and I don’t like it now. Why? The whole select a city is absolutely horrible. Why the standard time zones aren’t printed here I have no idea. I can’t begin to describe how frustrating it is to find a city with the proper time zone. Not to mention there are literally hundreds of options in the menu. It is not easy to navigate. I just looked at the time zone selector on Windows and there are 1/20th of the options available comparatively speaking when one just displays standard time zones.
There is an option of clicking the little itty bitty tiny very small ever so miniscule yellow dots with the hopes and prayers you select the right one too.
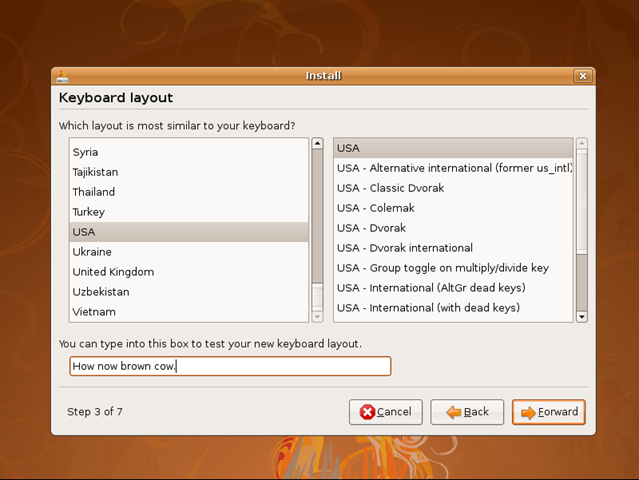
Step 3
This screen is easy. The nice thing that was done is the ability to select an option and see if it still works. Let’s go forward, I mean next.
Step 4
If you are setting up a machine and having Linux take up the entire drive this is pretty simple but still not very gump. With some minor UI work this could be simplified. I’m not really sure why the word “Guided” is even there. Why not just say “Use the entire disk” ? There is nothing guided about it since we are at step 4 and as we see the next step asks us for information.

Step 5
This is pretty simple. Fill out the form and move on. Easy and simple.

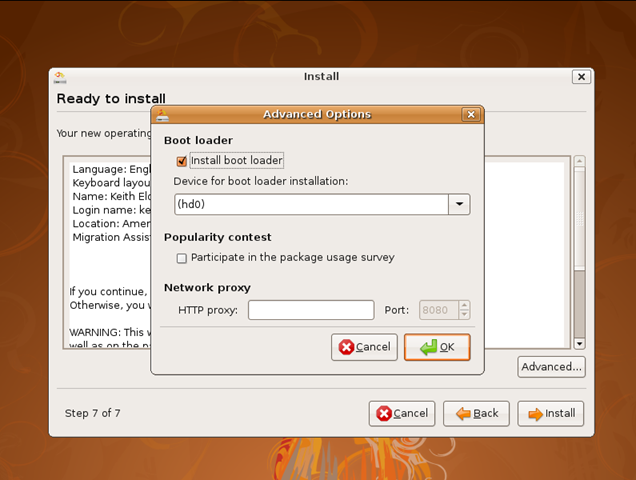
Step 7
Somehow step 6 doesn’t exist. I don’t know where it went. Maybe it was a step that didn’t have a user interface, who knows. We went from 5 to 7 get over it and let’s move on. It is driving me crazy too!
Step 7 is basically a review screen, not really enough to warrant a step. I think it could be eliminated.

Step 7.1
I couldn’t resist to see what was behind the curtain of the “Advanced…” button. Turns out it was just asking if we wanted to change the boot loader option. I think this should have been asked back in step 4. It seems out of place having it here.
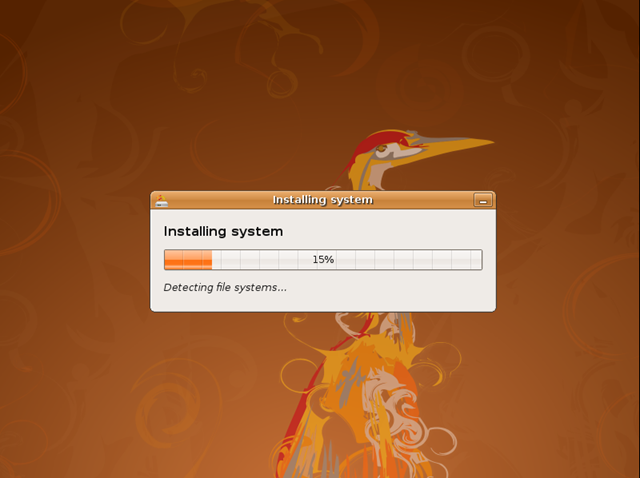
After pressing install the installation goes really quickly. On my Dell I think it was installed in like 5 maybe 10 minutes.

First Boot Up
After the system boots for the first time you are presented with a login screen that is really nice.

After logging in you are brought to the initial desktop for Ubuntu 8.04.1. At the top are the Gnome menus and the bottom is used as a task tray to switch between open applications.

Updates
A few minutes after being booted the first time Ubuntu went into action and prompted me about new updates for the operating system.
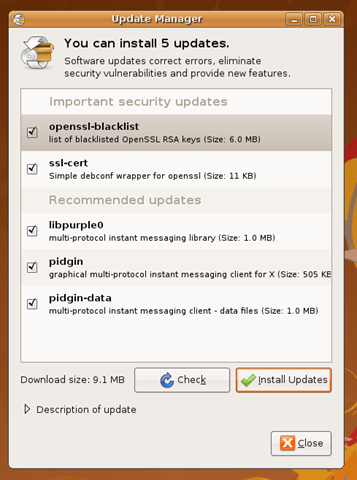
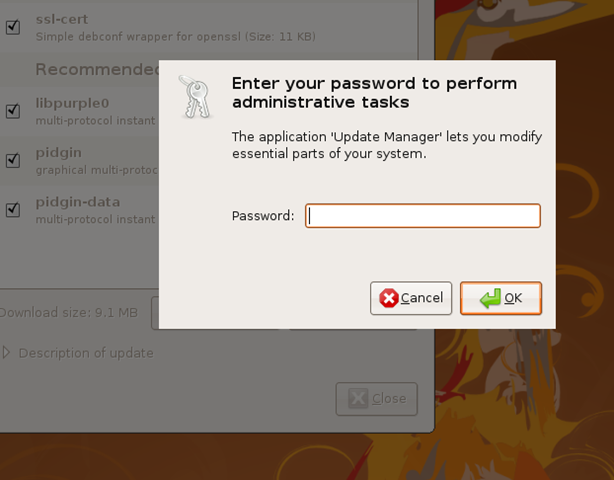
When pressing “Install Updates” the administrator or root password is needed. This is the password created for the account account back in Step 5. For users who don’t know about how Linux uses permissions this may not be that obvious. It would be nice to see this explained the first time a user is asked.

Installing Additional Software in Ubuntu
Ubuntu is based on Debian Linux and uses the same packaging system called apt. If this is your first Linux install you will want to open a terminal or use the Synaptic package manager application to install additional software. For example if you want to install the Eclipse IDE open a Terminal window and type the following:
sudo apt-get install eclipse
The word “sudo” is used to execute commands with evaluated privileges in Unix if it has been configured. Unix systems refer to this as “root” whereby Windows refers to it as “Administrator”. The rest of the command “apt-get install eclipse” will go out and download and install Eclipse. If you want to see what additional plugins Ubuntu supports then search the package management system using apt-cache. Here’s is how.
apt-cache search eclipse
This command will print all of the packages that have the word eclipse in them as shown here.
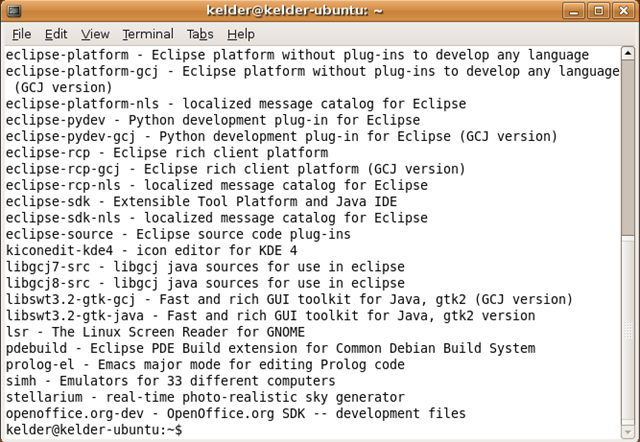
Those are the basic commands you need to know to install and find software to play with. Read and learn apt, it is your friend.
Thanks Ubuntu For Just Working
One of the really nice things Ubuntu did after being installed was do something I never got to work on Linux back in the day and that was wireless networking. I almost cried when I clicked in the upper right of the screen and saw my home wireless network. I selected it and I was online wirelessly! I remember spending countless hours trying to compile a wireless driver for another Dell I had before surrendering to defeat. Needless to say I was shocked at just being able to select a wireless location and it work. I’m still shocked.
Another thing Ubuntu did after being installed on my Dell was to tell me my battery may have been recalled and there was a non-free video driver that I could use. I downloaded the driver and restarted. I immediately saw a difference in speed.
For my Dell that sits in my living room Ubuntu is an easy choice. It comes with Firefox 3, Evolution for email as well as Open Office. That’s about all I really need for leisure browsing after work. I’ve already been playing around with Mono, Python and a few other things that I wanted to catch up on and it is a great feeling to be back at a real command prompt.
Keith,
I think a point may have been missed re the language coming up twice.
The distro disk allows you to run Ubuntu installing it so I guess it needs the language if you are going to run Ubuntu from the CDROM. Then if I decide to load it onto your computer it then needs to ask again.
Not sure of the feasibility of retaining that information once you load the CDROM into memory?
Ampers (Not a programmer)
Step 6 is when Ubuntu detects if you have any other operating systems installed, and if so, it will ask if you want to import any settings from those operating systems.
Like it asked me whether I wanted to import settings form Firefox.
Because there were no other OS’s, it wasn’t shown to you
Just another item, maybe we are getting confused as to which screens we are referring to. For the menu option where you pick “Install” versus “Try”, etc. I agree, text should be made available. I was referring to the two screens after that where I feel text is not necessary.
The user doesn’t need to know what needs to take place to boot the operating system or the installation process. Just my two cents.
@Keith,
My point for the password issue is in Ubuntu there is no “root” password. The root account is disabled. Sudo does not equal root. That is all I was trying to imply.
As for the boot screen text, I think we will just have to agree to disagree. I believe there is no need for text, as it is technically “booting” up the installer cd-image. Simply put, it is booting a linux image that automatically starts the installer application once loaded. It technically at this point is not installing anything.
Thanks
My first foray into Linux was Fedora on my 6+ year old Dell laptop, but I moved over to Ubuntu after I realized the wireless support was so much better/easier/less-stressful.
If it weren’t for the fact that the laptop wouldn’t install windows at all (for dual-booting) and the fact that I needed to get a new battery or two for it (since both had completely died in the two years I had let dust collect) I would’ve kept it and keep using Ubuntu. It really makes Linux very approachable for someone who is used to a Windows environment.
@Tom
The .DEB to .RPM conversion has been around for awhile but be careful of it. It isn’t always perfect but works in a pinch.
There apparently is an effort going on to make Mono packages for Ubuntu, I found it off the mono-project web site. Just FYI.
I too have not so fond memories of RPM-hell. YaST and zypper do a pretty good job these days of removing that pain, very APT like. As well, there are package managers that allow you to use .DEB packages on RPM based systems (and vis-versa).
Forgot to mention that what will impress you more is how easy it will be to upgrade Ubuntu. I truly love how simple it is to do that.
I used to add the other package repos in hopes of trying to keep up to date with a more recent Mono, but gave up. It’s just less friction for me to use openSUSE. If somebody starts actively maintaining Mono packages for Ubunutu, then I’d consider switching back.
@Tom
Hey Tom. I use to run SuSE a long time ago, but I really couldn’t go back to using a system that uses RPMs. It would just pain me to do so. Plus SuSE moves everything around on the system and breaks standard convention. Don’t get me wrong it is a nice system and I know people who use it and love it but i’m just too big of a APT fan.
Question on keeping Ubuntu uptodate. Did you add the other package repositories that are newer for mono?
FWIW, I’ve been experimenting the past couple of weeks with using Linux as my host OS and then using Windows in VMware images. Check my blog for brief details.
If you’re diving into Mono, I suggest openSUSE 11 instead of Ubuntu. The packages for openSUSE are actively maintained by Novell, and so it’s a lot easier to keep current. The install for openSUSE 11 is just a polished. I used to be a kubuntu fan, but got tired/frustrated with trying to keep Mono upto date. For example, Ubuntu 8 comes with Mono 1.2.6 – the current version of Mono is 1.9. Mono 2.0 should be out pretty quick, and if you want to play with the beta of Mono 2.0 there are daily builds available for openSUSE for your use.
Also, one thing that stung me with Ubuntu 8 was a bug whereby the CDROM drive would get “lost” on one computer in which I had 8GB of RAM. Apparently this is a know bug. The workaround is to boot Ubuntu with only 4GB of RAM.
@cpradio
Language – Maybe it is just me but if I need the English language to boot I would assume the user needs that language for the install. It is a minor point but my point is valid if it can implement the “DRY” principle. Don’t repeat yourself. Is it possible that someone would want to boot in English and then install in Spanish? I don’t know. I guess it is possible.
Heron – It was a joke, you were suppose to laugh! I thought the 12 guage analogy was pretty funny myself. As I said, I did like it, seriously, I do.
XP load screen – Here is the difference. You are confusing a load screen with an install screen. Remember I am not loading Ubuntu I am installing Ubuntu based on my selection. Thus I seriously think a user needs to know what is going on. (if installer == true) { PrintInstallText() }. That is all that needs to happen if the same screen wants to be used for both scenarios but I think that is the problem. If you know I am installing the experience should be different, not the same when booting.
UAC Vista – I started to go down this rabit hole and explain it in the similar context but I didn’t. You can call it UAC like Vista but the reality behind the scenes is it is issuing a sudo command. Believe me when I say this is way better than it used to be!
-Keith
“Thus far I have had to press enter to select a language and then enter to kick off the installer. If you recall, the first thing it asked me for was to select my language. Well guess what? It is going to ask AGAIN!”
I am a bit disappointed by this remark. The first language selection is for the CD Boot screen, not the installer. Secondly, I believe the language you select here is the defaulted language in the installer, so you really do not have to answer the question again, just confirm it.
“I dig the background of a penguin that looked like it got shot with a 12 gauge repeatedly.”
Come now, it isn’t that bad of a drawing to realize it is a Heron, hence the release name of Hardy Heron. It’s not a penguin.
“Knowing Linux the way I do I am sure this screen is loading necessary services Linux needs to load. Again, there is nothing to tell the user what is going on.”
XP is just as bad, do you think that XP boot screen means anything to us either? Remember, this is not part of the installation yet, it is simply booting up to let you run the installation.
“When pressing “Install Updates” the administrator or root password is needed. This is the password created for the account account back in Step 5. For users who don’t know about how Linux uses permissions this may not be that obvious. It would be nice to see this explained the first time a user is asked.”
This is completely wrong. It is not asking for a root password, it is asking for “Your password”. If you want to compare it to a Windows feature, think UAC in Vista. I believe this is adequately explained with the bold text at the top stating “Enter your password”.
Other than the items listed above, I believe you give it a nice review for not doing this for a while. I am a stickler for the command line installer myself, just because I typically need custom modules for some of my hardware.
The GUI installer is a real advantage and will definitely help the average user install Linux, as for Step 6, that is interesting, I can only think that this is because you formated the entire disk and skipped any partitioning changes you may have needed to do going a different route.