Welcome

You have reached the blog of Keith Elder. Thank you for visiting! Feel free to click the twitter icon to the right and follow me on twitter.

Making MP3’s with Linux Using Grip

Posted by Keith Elder | Posted in Linux, PC Software | Posted on 09-10-2000

1

If you are like me, you have started your MP3 collection and have converted just about every CD you own into your very own MP3 file. If not, then you are reading this for one of two reasons. 1. you want to know how the other side lives since you are coming from a Windows environment. 2. You asked someone and they sent you here. 3. You just installed Linux and are ready to build your own MP3’s. Whatever the reason, we are not going to get into debates about Napster just very simply turning your audio CD’s into an MP3 the easiest way.

The Program
Grip is a gtk-based cd-player and cd-ripper. It has the ripping capabilities of cdparanoia builtin, but can also use external rippers (such as cdda2wav). It also provides an automated frontend for MP3 encoders, letting you take a disc and transform it easily straight into MP3s. The CDDB protocol is supported for retrieving track information from disc database servers. Grip works with DigitalDJ to provide a unified “computerized” version of your music collection. GCD is the cd-player only version of Grip (for those who aren’t interested in track ripping/encoding). (taken from Grip’s homepage).

Explain…
Basically all music is put onto an audio CD. The music on the audio CD is not compressed in any way shape or fashion, it is simply a whole bunch of 0’s and 1’s stored into a file. These “files” as us computer geeks refer to them are called “tracks”. So basically the “track” is the actual song. The problem is we have to get that track/file off the CD where it is stored and onto our hard drive. Once there, we can then comress the file and the final result is a MP3 file. So, in a nutshell, we are going to take this “track” and convert that to a .wav file (something computers call sound files) and then run the .wav file through a program called an “encoder” which then encodes our huge .wav file into a much smaller, more portable file called a .MP3 file. I know, I’m a genius.

Ok, how do we do it?

First of course we have to install Grip. The Linux Tricks on ZorKa.Com are not meant to be a complete howto but a quick “give me the facts” so the install process will not be covered. However, with that said, if you don’t already have it installed simply go to the link provided above and download the rpm or if you have debian linux “apt-get install grip” will do the trick. After installed you will simply need to run “grip -d ” where ???? is your cdrom device (hdb, scd1, scd0, hdc, hdd, etc). Grip has to be told where the actual cdrom device is located. After you start your version of grip you will want to then select the “Config” button and setup how and which “encoders and decoders” you selected to install. Notice that Grip can use a lot or practically all of the encoders/decoders that are written currently for Linux. The two main ones were are going to focus on is “Rip” and “MP3”. The “rip” is used to describe the process of getting the “track” off of the CD and into a “file” onto the hard drive. The “MP3” is the process of encoding the “file” or .wav file as it is called, into a MP3 file. Two things to note: 1. Be sure that you include the full path to your CD ripper and your MP3 encoder. 2. Make sure the one you choose is installed on your system.

Let’s Rip and Encode!
From here on out the process is very simple. Insert an Audio CD into your CDROM of choice and start Grip. An opening screen shot will look like this:
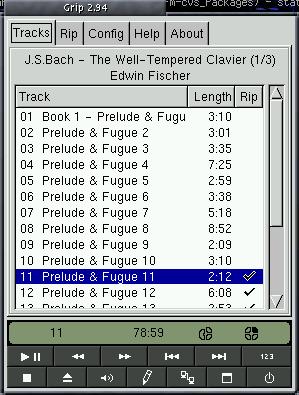
Notice that magically Grip knew the name of our Audio CD and also named all of the files/tracks listed on the CD. How did it do that? Well, if you were connected to the Internet when you launched Grip, Grip actually went out to the CDDB web site and looked it up for you! This allows Grip to automatically name the files for you when it goes to rip and encode the files! You will also notice at the very bottom of the picture there are some checks beside the tracks at the end. These files are the ones selected to be turned into MP3s. By pressing the “RIP” button on this screen we can automatically select all files on the CD. Next, we simply want to takes these files and turn them into MP3s. We do this by very simply clicking on “RIP” in the top tab section and pressing “Rip+Encode”. Grip will then start to rip the tracks from the audio CD and put them into a directory on the hard drive (this is setup in the config section when you select your ripper).
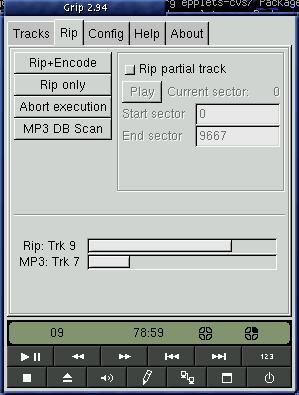
The above screen shot shows the process of Grip actually ripping and encoding an Audio CD. Notice that we are actually ripping and encoding at the same time and are not really doing anything special to make this happen. This is the real beauty of Grip. Easy, powerful, and smart enough for the average bear.

Conclusion
Ease of use, flexibilty, and built on Linux, what more could anyone ask for?

HDPARM – The Hard Drive Utility

Posted by Keith Elder | Posted in Linux, PC Software | Posted on 26-09-2000

2

“If you have an older machine, or even a newer machine with a new ATA/33 or ATA/66 hard drive, did you know that you are probably not even using it to its full capacity? It is true that most motherboard IDE chipsets are not directly supported by the Linux kernel. However, with a little tweaking, you can take full advantage of the new chipsets and even improve overall system performance.

Give me the facts
hdparm – get/set hard disk parameters

(zorka@zorka)::(zorka)
(~):hdparm -c3d1m16X66 /dev/hda


the above command, you will basically set the parameters on your hard drive to use the built in functions of today’s IDE chipsets that do not get setup for you when Linux is installed. Let’s say we issued the following command “hdparm -t /dev/hda”. This would benchmark our hard drive and produce the following output:

debian:~# hdparm -t /dev/hda


As you can see, our hard drive benchmarked a little over 14.07 MB/sec and more than likely if this machine wasn’t running any other processes while it benchmarked itself we would see much higher results, normally around 15 MB/sec for this machine.

does HDPARM do though?
Well, if you want to read about it I suggest doing a “man hdparm” to really get the full scoop. However the above command that we issued “hdparm -c3d1m16X66 /dev/hda” I will breakdown for you and give you a few more pointers. Note: Using this command can crash your machine.

Let’s take them one by one
-c3 = Query/enable (E)IDE 32-bit I/O support. Basically I have found that “-c1” will basically work with just about any board, however “-c3” tends to work better with the newer pentium/k62 chipset motherboards. I have normally seen a difference from .5-1MB in speed using “-c1” and “-c3” (c3 being faster). The values you can pass to the -c option are 0, 1, and 3.

-d1 = Disable/enable the “using_dma” flag for this drive. Of course we want this enabled to take advantage of our Ultra DMA hard drive. This one is pretty simple.

-m16 = Get/set sector count for multiple sector I/O on the drive. We have a lot of choices to use on this option: 0, 2, 4, 8, 16, and 32. There are some indications about using Western Digital hard drives even in the man page for hdparm so if you have a WD drive, please read the man page for more information as to what you should use. To date I have not been able to pass a “32” to the -m option, only “16”. In a nutshell, this feature enabled is suppose to reduce overhead of disk I/O anywhere from 30%-50%.

-X66 = Set the IDE transfer mode for newer (E)IDE/ATA2 drives. If you have a newer ATA/33 or higher hard drive, this is the option that really makes a difference and the one that can also bring your box to a grinding halt. In playing with the hdparm utility, I have crashed several machines. Most of the time it is because I told hdparm that I was running a faster drive than what I had. Example, on my Dell Latitude XPICD laptop, I issue the following command: hdparm -c1d1m16X34. . I normally get about 8MB a second after I benchmark and before I was getting 1.6MB! See what a difference it can make? I am not going to go into detail about how the “66” is derived because you really need to read the man page. However I will tell you that if you have an ATA/33 hard drive or newer you cannot go wrong using the -X66 option. On older drives or machines where you really don’t know what is in it, start with -X33 and if that works keep increasing it and pray the box doesn’t crash.

Conclusion
A lot of people are all about using the latest and greatest hardware in their machines, however, they never really take advantage of it. If your computer takes a long time to startx or to launch Netscape, then more than likely you need hdparm to come to the rescue. Another recommendation is that when you go shopping for a new motherboard, make sure the kernel supports it chipset and compile your kernel with it built in.


/dev/hda:
Timing buffered disk reads: 64 MB in 4.5
seconds = 14.07 MB/sec
debian:~#


/dev/hda:
setting 32-bit I/O support flag to 3
setting multcount to 16
setting using_dma to 1 (on)
setting xfermode to 66 (UltraDMA mode2)
multcount = 16 (on)
I/O support = 1 (32-bit)
using_dma = 1 (on)

Implementing a Scroll Mouse in X with the Logitech Mouseman+

Posted by Keith Elder | Posted in Computer Hardware, Linux, PC Software | Posted on 25-09-2000

0

Edit your .Xdefaults and paste the following text:


!## NETSCAPE
Netscape*drawingArea.translations: #replace
: ArmLink()
: ArmLink()
~Shift: ActivateLink()
~Shift: ActivateLink(new-window)
DisarmLink()
Shift: ActivateLink(save-only)
DisarmLink()
Shift: ActivateLink(save-only)
DisarmLink()
: DisarmLinkIfMoved()
: DescribeLink()
: xfeDoPopup()
: ActivatePopup()
Ctrl: PageUp()
Ctrl: PageDown()
Shift: LineUp()
Shift: LineDown()
None: LineUp()LineUp()LineUp()LineUp()LineUp()LineUp()
None: LineDown()LineDown()LineDown()LineDown()LineDown()LineDown()
Netscape*globalNonTextTranslations: #override
Shift: LineUp()
Shift: LineDown()
None:LineUp()LineUp()LineUp()LineUp()LineUp()LineUp()
None:LineDown()LineDown()LineDown()LineDown()LineDown()LineDown()
Netscape*toolBar.destinations.isEnabled: false
Netscape*toolBar.myshopping.isEnabled: false
Netscape*toolBar.search.isEnabled: false
Netscape*toolBar.viewSecurity.isEnabled:
false

1200
ZAxisMapping 4 5
EndSection

This should take care of it. Simply restart your XServer and give it a try. NOTE: For some reson Netscape will stop working after a little while, the reason is unknown at this point

Debian is up and Running

Posted by Keith Elder | Posted in Linux | Posted on 19-06-2000

0

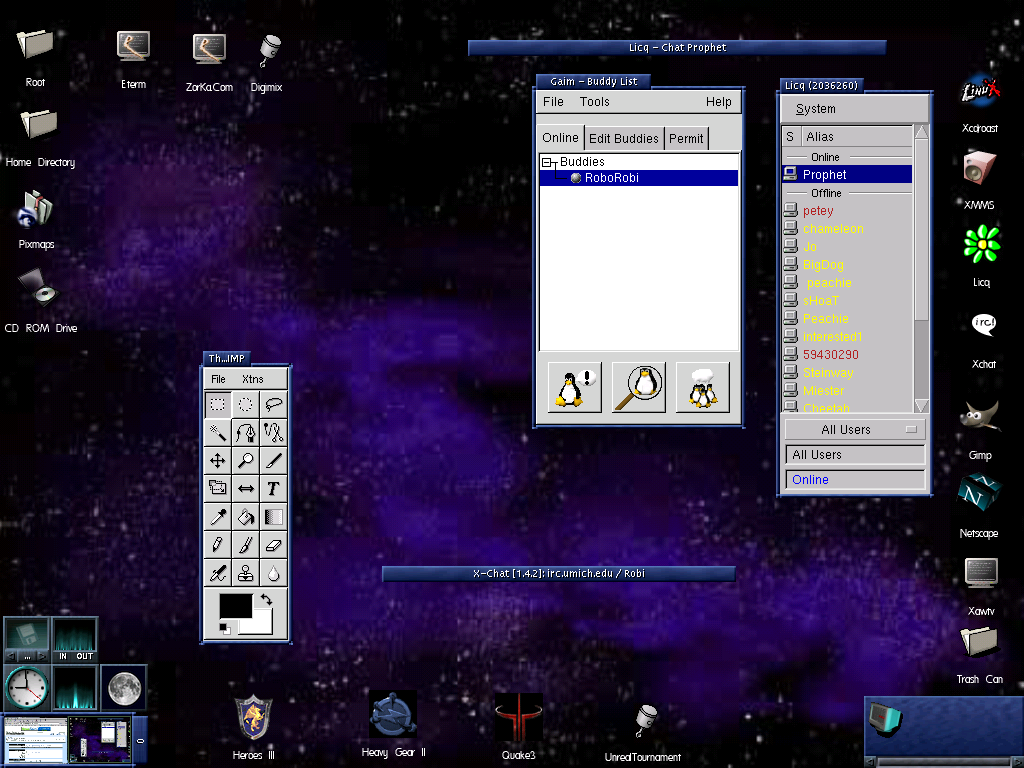
Well, I finally got my box rebuilt out with Debian Linux. So far everything is working except the TV Tuner Card. If you want to see a screen shot pimped out with EFM (enlightenment’s file manager) here you go.