Welcome

You have reached the blog of Keith Elder. Thank you for visiting! Feel free to click the twitter icon to the right and follow me on twitter.

WCF and WF No Application Endpoints Error

Posted by Keith Elder | Posted in WCF, Workflow Foundation | Posted on 13-03-2008

4

One of the new additions for Windows Workflow in .Net 3.5 was the ability to host Workflows using Windows Communication Foundation.  Two new activities were added to help with this.  The ReceiveActivity and the SendActivity.  I was recently playing with this and ran into a configuration error so I thought I’d post this to help others. 

After I had configured my workflow with a ReceiveActivity I added a WCF IIS project to my solution.  I configured it the way I thought it would work but I kept getting this error.  This was suppose to be a simple “hello world” experiment with WCF and WF but a few minutes later I was still scratching my head.

Service ‘Service.YourService’ has zero application (non-infrastructure) endpoints. This might be because no configuration file was found for your application, or because no service element matching the service name could be found in the configuration file, or because no endpoints were defined in the service element.

My service file in my IIS project looked like this:

<%@ ServiceHost Factory="System.ServiceModel.Activation.WorkflowServiceHostFactory" Language="VB" Debug="true" Service="CHCWorkflow.Prescriptions" %>

And my WCF configuration was like this:

image


For some reason when I configured the WCF service and when I configured the Workflow I changed my naming convention.  Here was the fix. 

  1. Go into the properties of the workflow by right clicking the workflow and pressing properties in the menu.
  2. In the properties window expand the WorkflowServiceAttributes node
    image
  3. Make sure the ConfigurationName property matches the name in the WCF configuration.  Here is a screen shot of the WCF configuration utility side beside the property to show you were I goofed.
    image

Once I got the names in sync the service started working.  I’m sure someone will run into this so I hope this saves you the headache it caused me. 

Exposing a WCF Service With Multiple Bindings and Endpoints

Posted by Keith Elder | Posted in .Net, WCF | Posted on 17-01-2008

52

Windows Communication Foundation (henceforth abbreviated as WCF) supports multiple bindings that allows developers to expose their services in a variety of ways.  What this means is a developer can create a service once and then expose it to support net.tcp:// or http:// and various versions of http:// (Soap1.1, Soap1.2, WS*, JSON, etc).  This can be useful if a service crosses boundaries between intranet and extranet applications for example.  This article walks through the steps to configure a service to support multiple bindings with Visual Studio 2008 and the .Net 3.5 framework.  For those that want to jump directly to the sample solution it can be found at the end of this article.

Setting Up The Test Solution

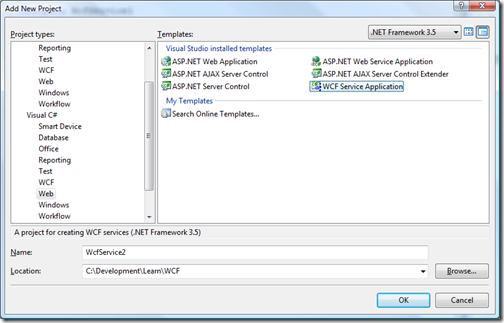
Below you will find the steps used to create the sample solution.  I’ll explain a few WCF concepts along the way but probably not all of them.  I will however link to relevant documentation where applicable.  To get started, within Visual Studio 2008 create a new WCF Service Application project.  This template can be found within the web section of Visual Studio 2008 as seen here.

image

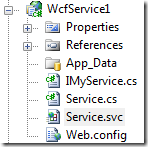
After the project is initialized modify it so it contains four files, note this will require deleting the default files:  IMyService.cs, Service.cs, Service.svc, and Web.Config.  Once you have cleaned up the default template, it should look like this:

image

Creating Our Service Contract
The IMyService.cs file will contain our service contract.   In old ASMX services, in order to expose a method as a service one would attribute the method with the attribute of [WebMethod].  In WCF, everything is tied to a Service Contract.   By defining our service contract as an interface, any class that implements that interface can be exposed as a WCF service.  In order to achieve this a ServiceContract attribute will be placed on the interface and an OperationContract attribute will be placed on the method we want to expose for our service.  Our interface is going to be simple and will just contain one method to add two numbers.  Here is the sample.

[ServiceContract(Namespace="http://keithelder.net/Learn/WCF")]

    public interface IMyService

    {

        [OperationContract]

        int AddTwoNumbers(int x, int y);

    }

Implementing The Contract
The Service.cs file will contain the implementation of the IMyService interface.  Again, since we defined our contract as an interface our service class doesn’t need or have any attributes on it.  Here is the code:

    public class Service : IMyService
{
public int AddTwoNumbers(int x, int y)
{
return x + y;
}
}

Creating The Service Host
The file Service.svc will provide the endpoint for our URL that will be exposed by IIS.   Within this file, we only need one line which identifies the class that contains our service using the ServiceHost directive.  Here is the code for this file.

<%@ ServiceHost Language="C#" Debug="true" Service="WcfService1.Service" CodeBehind="Service.cs" %>

Now that we have the contract specified and implemented along with an endpoint to host the service everything from here on out is just configuration.  This is the beauty of WCF.   How we want the service to be exposed is stored within the web.config file.  There a lot of options in WCF and those just learning WCF are typically overwhelmed at the amount of options.  Luckily Microsoft has a tool to help us along.  The upside to this approach is we do not have to code how our service is secured as we did in older ASMX services.

Setting Up Basic Http Binding

Before we add multiple bindings to our single service, let’s focus on adding one binding.  In order to configure our service we are going to use the Microsoft Service Configuration Editor.  This editor allows us to configure our WCF service and can be launched right from Visual Studio.  To launch the editor, right click on the web.config file.  An option should be in the menu that says “Edit WCF Configuration”.  If it doesn’t don’t worry, sometimes, Visual Studio doesn’t pickup this option.  A trick is to go to the tools menu in Visual Studio and select the editor from there.  After the editor is launched it will then show up in the menu when you right click the web.config file.

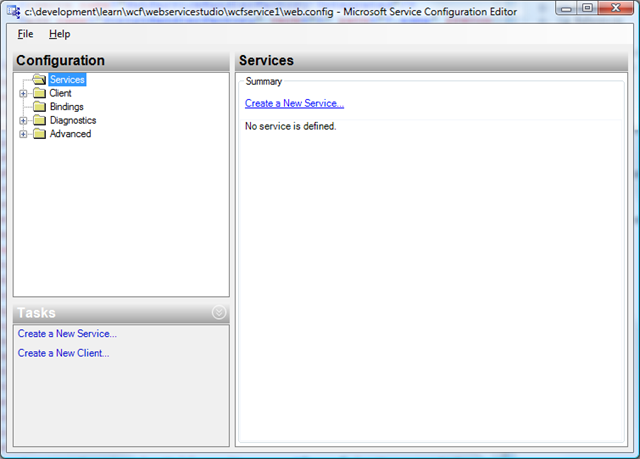
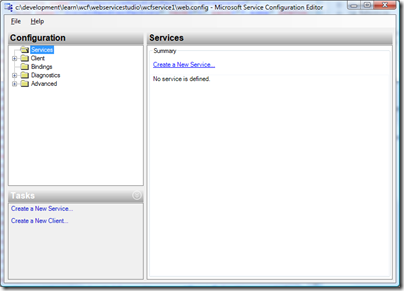
For this example I have removed everything from the web.config file before launching so I can configure the service completely from scratch.  Opening the web.config with the editor shows a blank configuration as follows.

image

Follow the steps to initialize the configuration.

Step 1
Make sure your solution builds.

Step 2
Click “Create a New Service” in the right panel of the editor.

Step 3
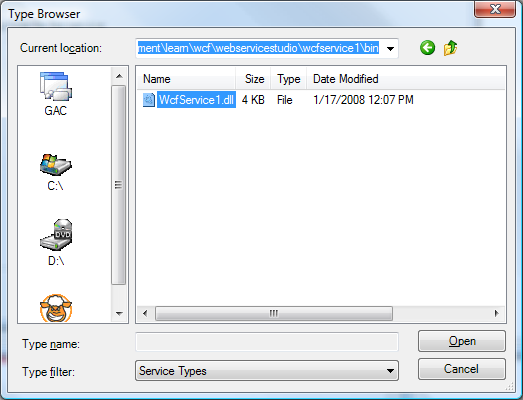
Browse to the bin directory and select the WcfService1.dll (if the file doesn’t show up, go back to step 1)

image

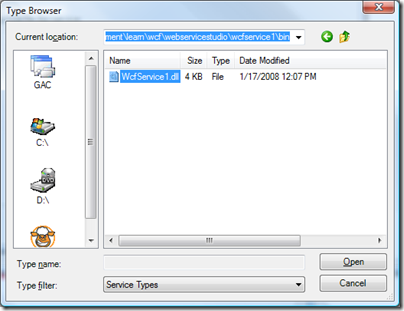
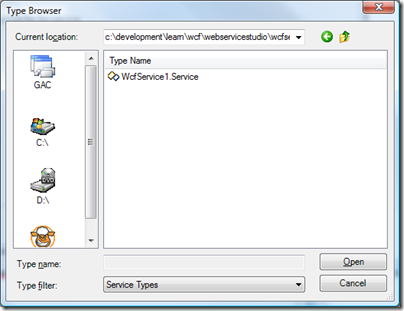
Double click this file and select your service implementation.

image

Step 4
The service type should be displayed on the previous screen.  Press Next->.

Step 5
Select the contract.  This should automatically be selected to WcfService1.IMyService.  Press Next->.

Step 6
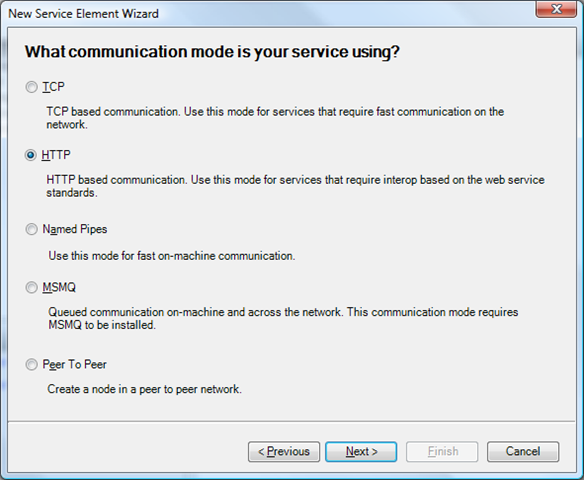
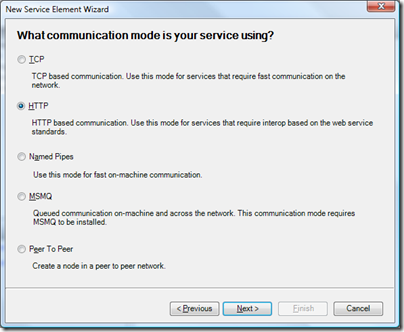
Since we are using IIS to host our service select the HTTP option for the communication mode.

image 

Step 7
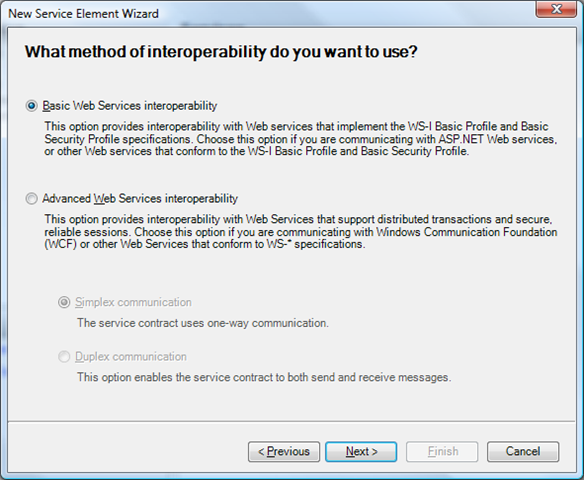
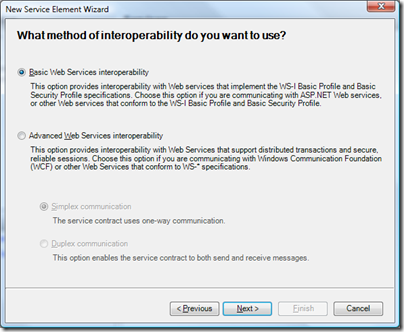
Select the basic web services interoperability.  We’ll come back later on and add advance web services interoperability.

image

Step 8
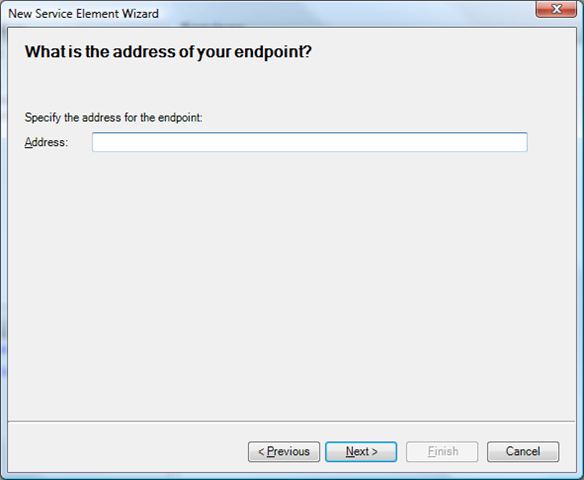
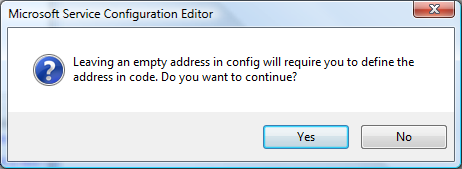
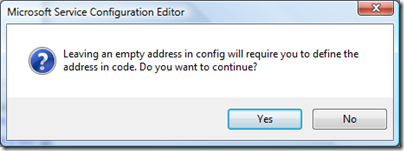
Delete the “http://” from the address field.  Since we are developing we don’t know which port this will get assigned as of yet.
image

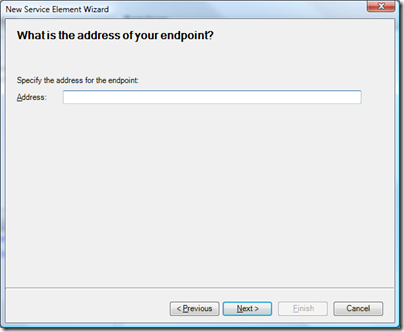
Press Next->.  A dialog will appear.  Select Yes.

image

Press Finish on the next screen.

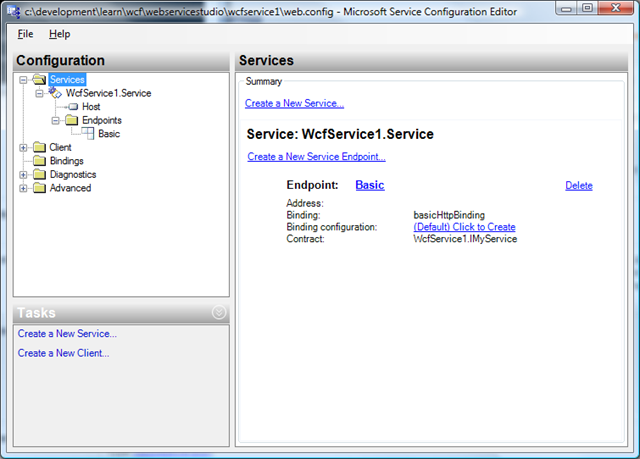
At this point we have an almost configured service.  If you drill down into the Services folder within the tool down to the end point the configuration should look something like this.
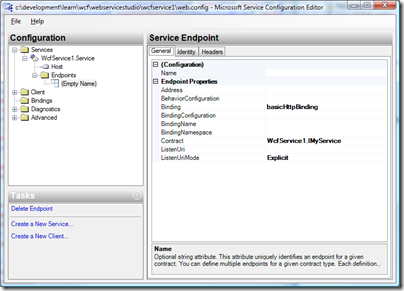
image

Step 9
Let’s clean up our configuration.  In the screen shot above in the configuration section.  Give this endpoint a name of “Basic”.  This will let us know later on this endpoint is our BasicHttpBinding configuration which supports the SOAP1.1 protocol.

Step 10
Click on the “Services” folder in the editor.
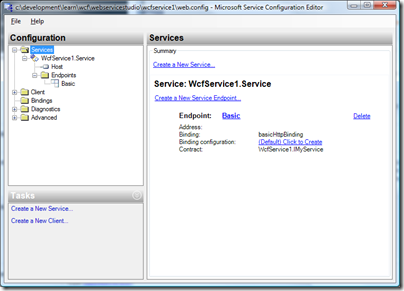
image

Step 11
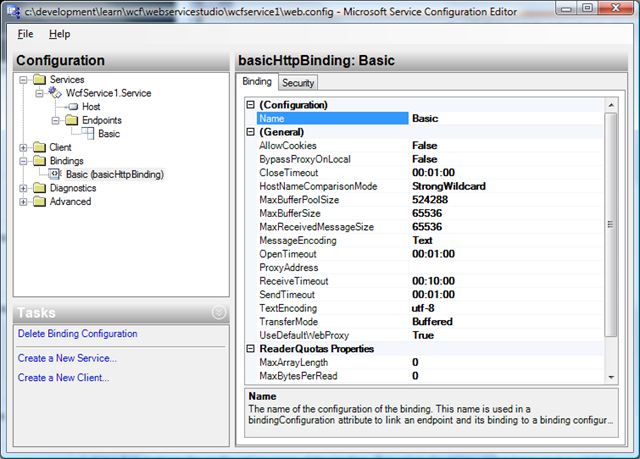
Next to the binding configuration there is a link that says “Click to Create”.  Click this link to create a binding configuration.  While this isn’t necessary in all instances it is a good practice to have a binding configuration.  This gives you more control over how your binding is configured and is a good practice to initialize early on.

Clicking this link will create a new binding.  In the name field under the configuration section, give it a name of “Basic”.  The defaults for this example are fine.

image

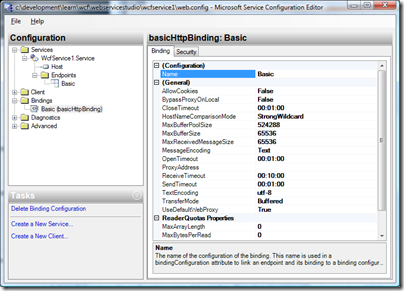
Note:  Clicking on the Security tab in the above screen the Mode should be set to None. 

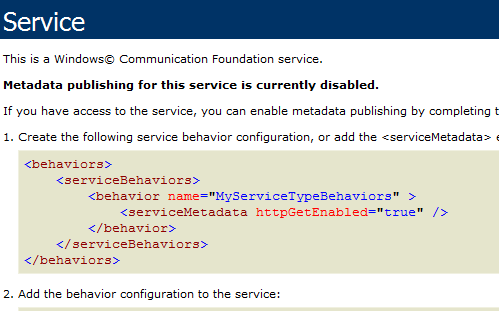
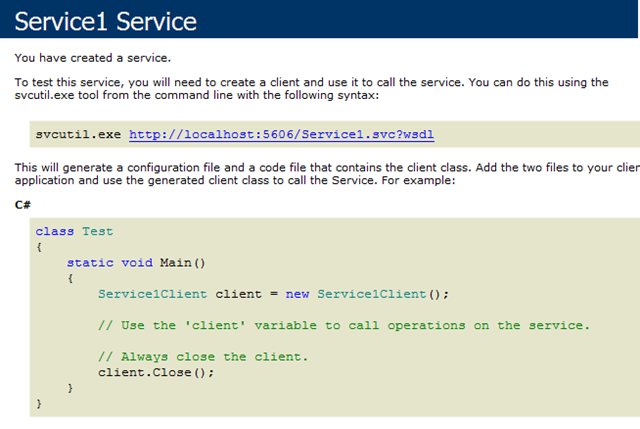
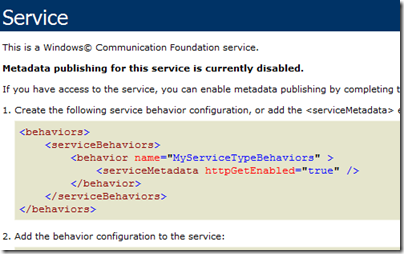
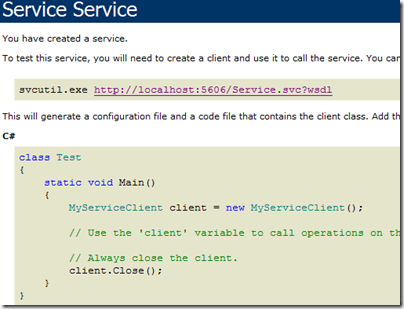
At this point you should be able to save your configuration and press F5 in Visual Studio to launch your service in debug mode.  You should be presented with a web page that looks like the following:

image

Exposing Our Service’s WSDL

Unlike previous ASMX services, the WSDL (web service definition language) for WCF services is not automatically generated.  The previous image even tells us that “Metadata publishing for this service is currently disabled.”.  This is because we haven’t configured our service to expose any meta data about it.  To expose a WSDL for a service we need to configure our service to provide meta information.  Note:  The mexHttpBinding is also used to share meta information about a service.  While the name isn’t very “gump” it stands for Meta Data Exchange.  To get started configuring the service to expose the WSDL follow the following steps.

Step 1
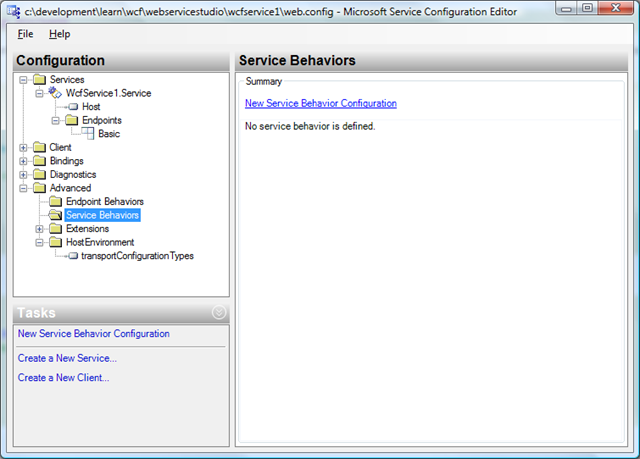
Under the Advanced folder in the editor, select the “Service Behaviors”.

image

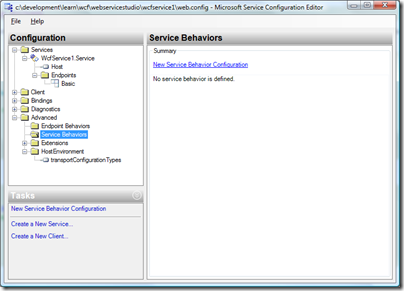
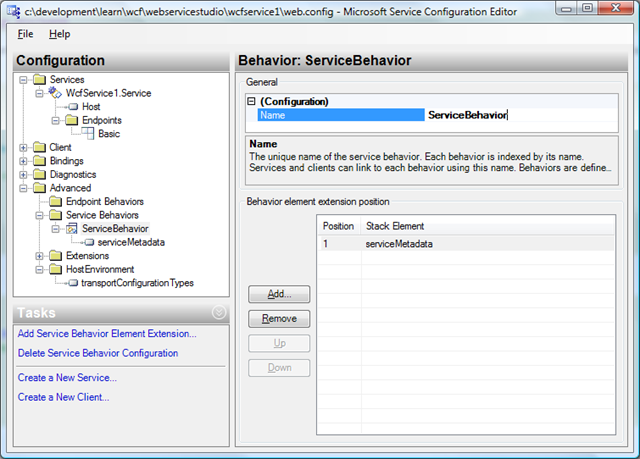
Click the “New Service Behavior Configuration” link in the right pane.

Step 2
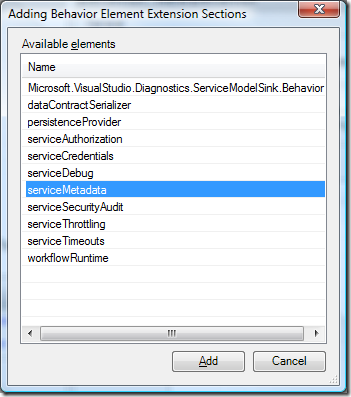
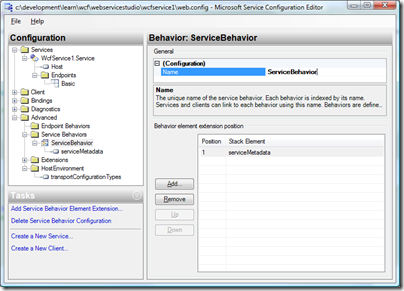
Name the behavior “ServiceBehavior”.  In the bottom section press the add button and select the “serviceMetaData” option and press Add.

image

The end result should look like the following.
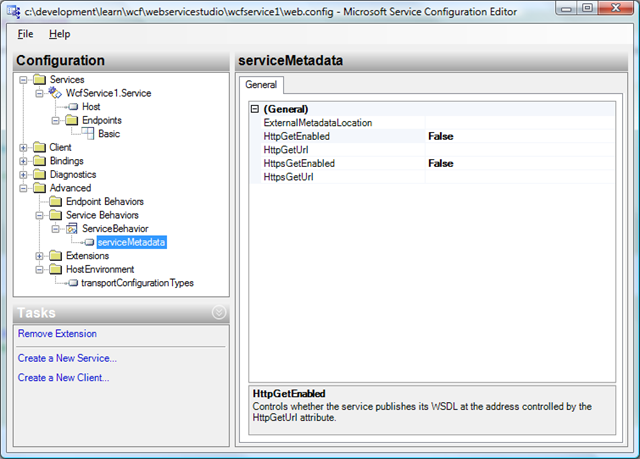
image

Step 3
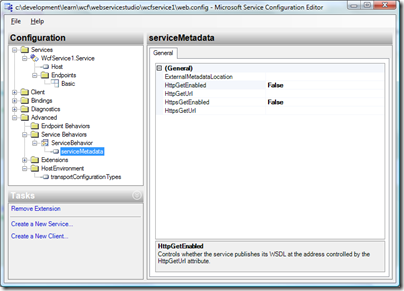
Under the “Service Behaviors” folder, select the newly created “ServiceBehavior” option and then the “serviceMetadata” option underneath that.  In the right pane change the HttpGetEnabled to True.
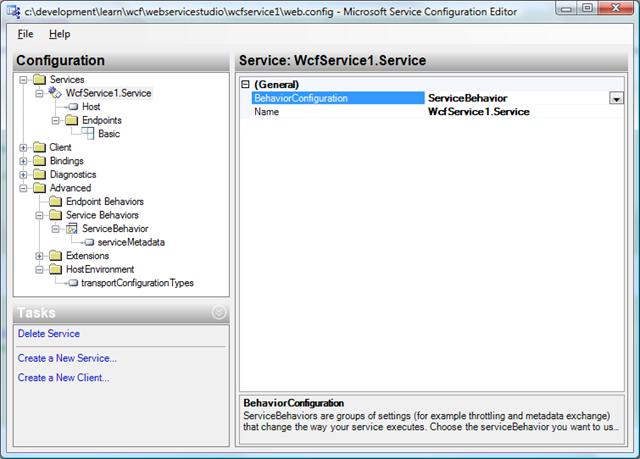
image

Step 4
Select the service under the Services folder and apply the new service behavior to the service.
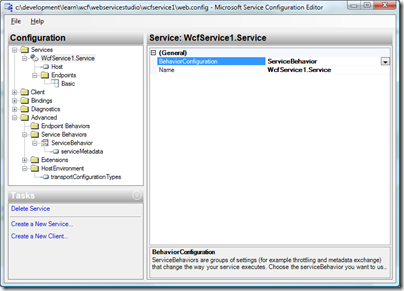
image

Step 5
Save the configuration and reload the service in the browser.  The page should be changed to the following:

image

Clicking on the link should display the WSDL for the service.

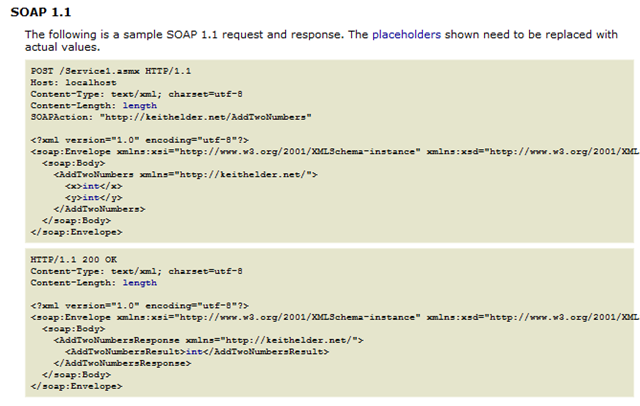
At this point our service is configured to support the SOAP1.1 protocol through the BasicHttpBinding and is also exposing the WSDL for the service. What if we want to also expose the service with the SOAP1.2 protocol and support secure and non-secure messages?  No problem.  We can expose the service all of those ways without touching any code only the configuration.

Adding More Bindings and Endpoints To Our Service

Now that we have the basic binding working let’s expose two additional endpoints for our service which support the WS* protocol but are configured differently.  We’ll expose a plain SOAP1.2 protocol message using the wsHttpBinding that is a plain message as well as a secured message using the wsHttpBinding.

Step 1
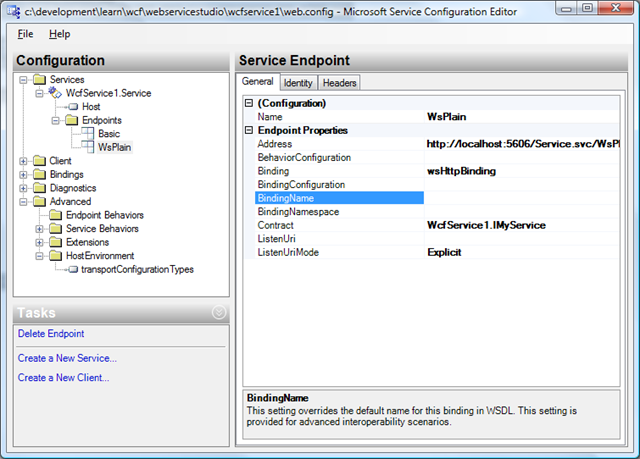
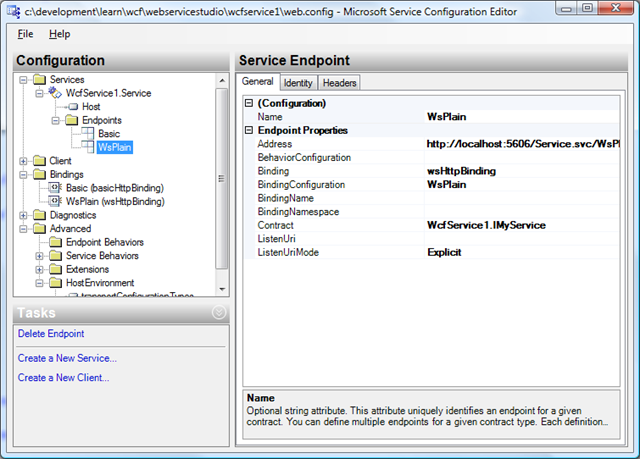
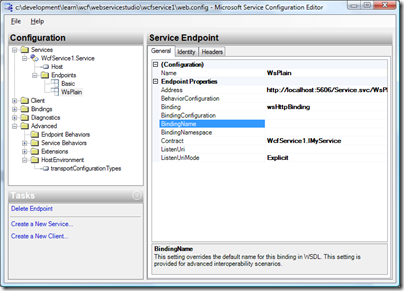
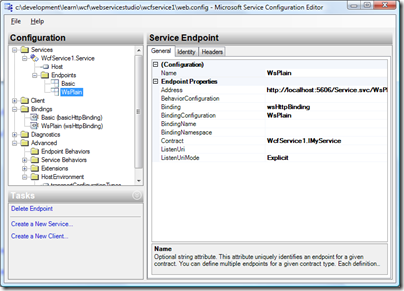
Under the Services folder select the EndPoints folder for the service and add a new service endpoint.  Give it a name of WsPlain.  This endpoint will serve as a standard SOAP1.2 message that isn’t encrypted.  Change the binding to wsHttpBinding.  In the address field, copy the address from your browser.  In my case, my project used the address of http://localhost:5606/Service.svc.  Paste this into the address field and add /WsPlain to the end of it so it looks like the following:

http://localhost:5606/Service.svc/WsPlain 

Each binding for each endpoint has to have a separate address.  Doing it this way allows us to keep our one service file and offer it up in various configurations.  In the contract option browse to the DLL in the bin directory and select the contract used previously.  The end result should look similar to this:

image

Step 2
Just as we did previously, click on the Services folder and create a binding configuration for this endpoint.  Refer to step 10 and 11 above.

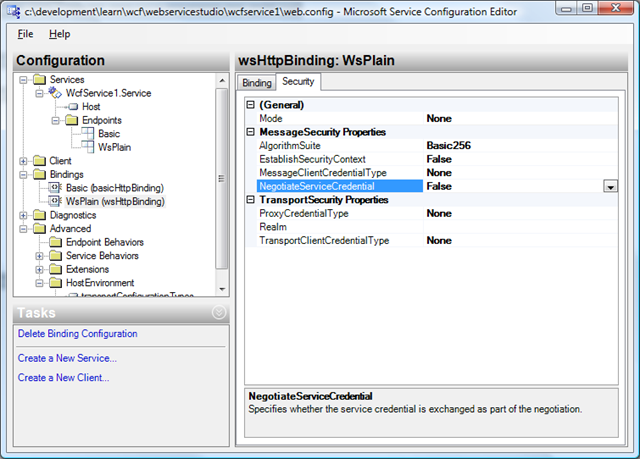
Provide a name of WsPlain for the new binding.  In the security tab change the mode to “None” and set all other options to false or none.  This is setting up our binding so there is no security on our message.  By default the binding is configured to be secure.

image

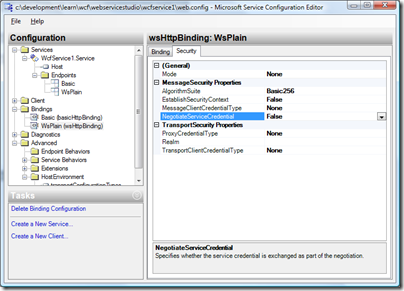
The final settings for the WsPlain endpoint should be similar to this.
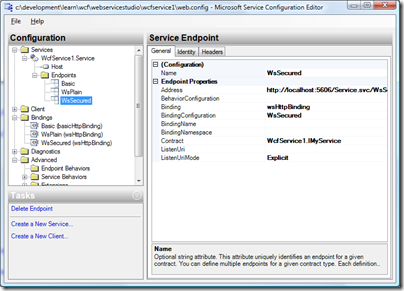
image

Step 3
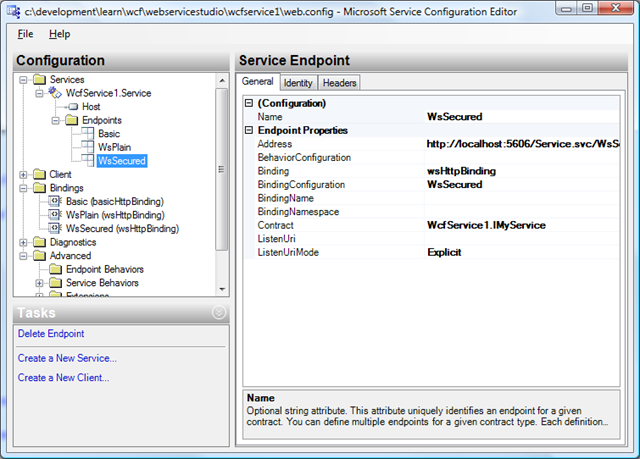
To configure a secure binding using wsHttpBinding follow these same steps above but leave the default values in the security tab of the binding configuration.  Call this end point and binding WsSecured.  The new endpoint should look like this:

image

That’s it, our service is now configured three different ways and is configured to support SOAP1.1, SOAP1.2 and WS*.  Pretty cool huh?

Testing Our Service

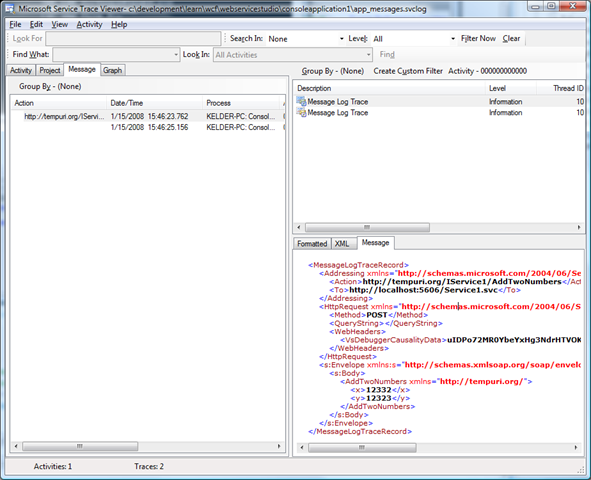
Now that our service is configured with three different bindings, let’s look at the messages as they go back and forth across the wire.  In order to do this we are going to borrow knowledge from a previous article I did called “How to Get Around WCF’s Lack of a Preview Web Page and Viewing WCF Messages“.  From this article we are going to borrow the MessageViewerInspector class and build a small windows application to view our messages.

If you are still following along, add a new project of type Windows Application to the existing solution and then copy the MessageViewerInspector class from the referenced article and add it to the project.

If you have been following along you may have noticed that we only have one WSDL.  The WSDL contains all of our endpoints.  Even though we have three endpoints, we still only have one WSDL.  In testing with some third party clients my experience has been that clients only generate proxies for the endpoints they understand.  Add a service reference to the service to the windows application.

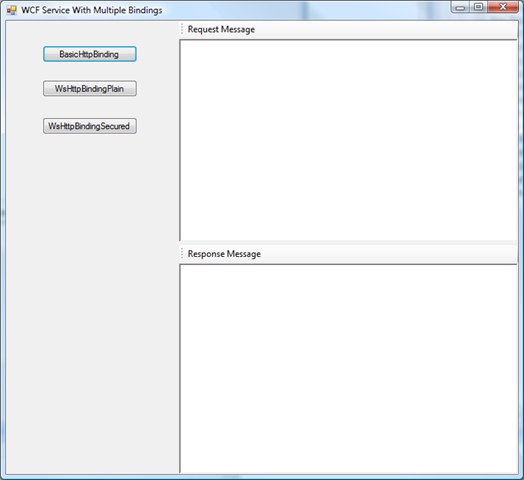
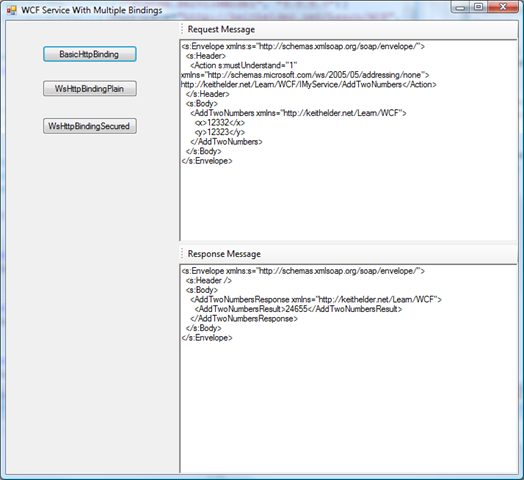
For the user interface I decided to use several split panels and create a three panel layout.  Here is what it looks like.

image

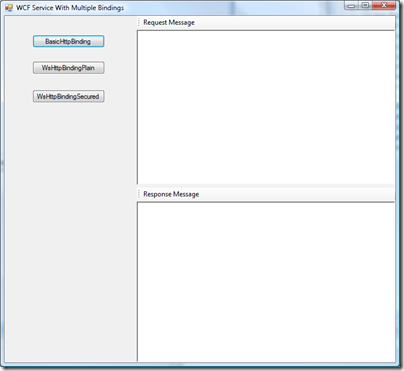
The idea is simple.  When I click on each button I want it to invoke my service and then display the request and response messages the service is using.  To do this I created one service method called CallService which is passed the end point name the service is to invoke.

        private void CallService(string endPoint)
{
MessageViewerInspector inspector = new MessageViewerInspector();

ServiceReference1.MyServiceClient proxy = new WindowsFormsApplication1.ServiceReference1.MyServiceClient(endPoint);

proxy.Endpoint.Behaviors.Add(inspector);
proxy.AddTwoNumbers(12332, 12323);
proxy.Close();

richTextBox1.Text = inspector.RequestMessage;
richTextBox2.Text = inspector.ResponseMessage;
}

The endpoint is the name of the endpoint we specified in our configuration.  For example to invoke the secure wsHttpBinding it is called like this.

CallService("WsSecured");

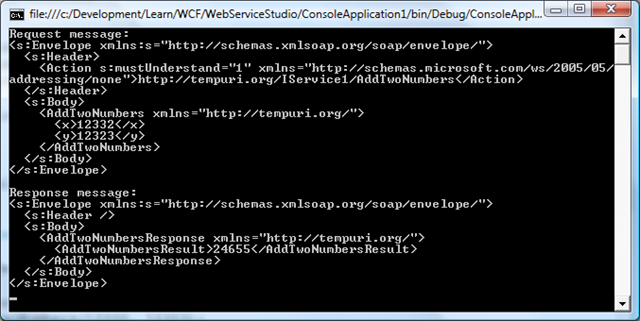
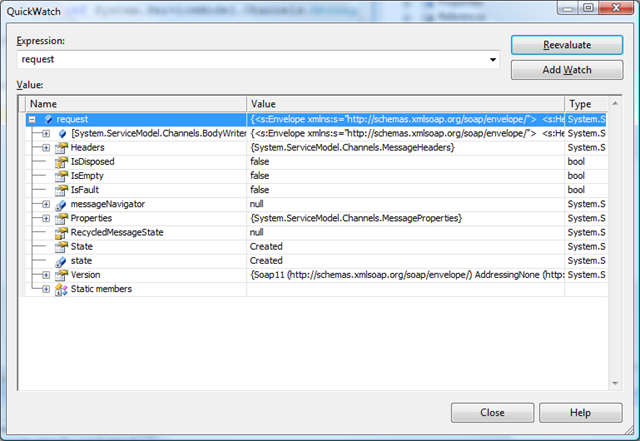
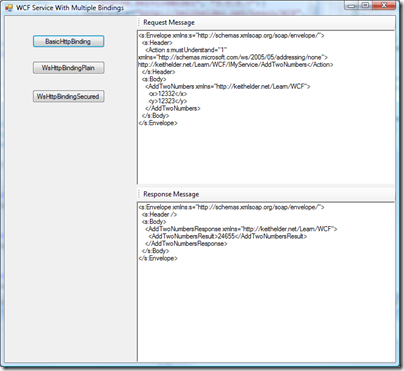
The first thing created is create the inspector so messages can be viewed coming in and out of the proxy class.  Once the proxy method is called we can then grab the messages and put them into the RichTextBox control on the form.  Here are screen shots of each call to the service.

BasicHttpBinding – SOAP1.1

image

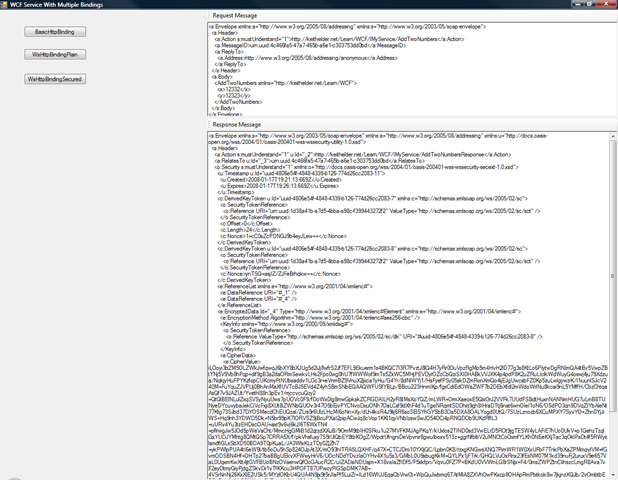
WsHttpBinding – SOAP1.2 Plain / Unsecured

image

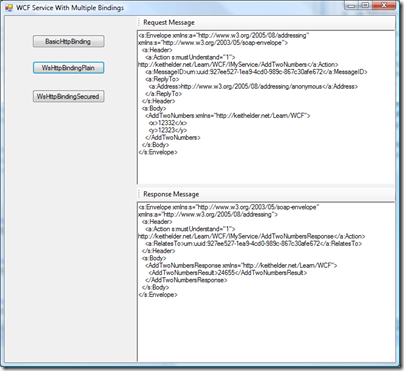
WsHttpBinding – SOAP1.2 Secured

image

Conclusion

WCF services are powerful as you have just seen.  It is possible to expose a single service in more ways than just one.  This allows developers to support things like net.tcp binary messages and SOAP messages from the same service.  If you are an enterprise developer supporting multiple clients this is a blessing since it means .Net consumers of your service can use TCP while other consumers use WS*.  The nice thing is the developer doesn’t have to code it, just declaratively express how he wants the service configured. 

Download Sample Solution:

Like this article? kick it on DotNetKicks.com

How to Get Around WCF’s Lack of a Preview Web Page And Viewing WCF Messages

Posted by Keith Elder | Posted in Asp.Net, WCF, Web Services | Posted on 15-01-2008

10

I have a love hate relationship with Windows Communication Foundation.  I love it because the concepts of building a service are so simple.  I love the fact that I can expose the same service three different ways supporting different interoperability points within the business.  I also hate it because a there are so many ways to configure the service it can get daunting at times.  Configuration isn’t as bad as the built-in lack of ability to view messages.  WCF doesn’t provide a sample message page describing the SOAP messages for a request and response like the old ASMX services.  While this may not seem like a big deal there are systems I am having to interop with that can’t simply point to a WSDL and generate a proxy client from it (yes there still are some out there) and it is a problem.

The Problem

WCF offers a lot of binding options but when interopping with non .Net clients the basicHttpBinding is the obvious choice because it is the simplest.  If you can’t get that to work, good luck on the other ones.   Here is the quote from the MSDN pages about basicHttpBinding.

Represents a binding that a Windows Communication Foundation (WCF) service can use to configure and expose endpoints that are able to communicate with ASMX-based Web services and clients and other services that conform to the WS-I Basic Profile 1.1.

Changing bindings is really easy in WCF.  In VS2008, right click the config file in the project and select “Edit the WCF Configuration”.   The Microsoft Service Configuration Editor will then appear.  In the Services folder select the endpoint you want to change and in the binding section select the one you want.  This is the easy part.  The hard part is showing someone the message tied to the binding the service expects if they cannot generate a proxy within their language or platform from a WSDL.  In old ASMX services if the URL of the service was visited it would generate some nice pages for us automagically like this:

ASMX services display methods in service 

image

ASMX services when running locally could be easily tested with a prebuilt form

image

ASMX services provided a sample request and response XML message 

image

To the contrary WCF only provides .Net client info

 image

Yeah it is real useful isn’t it?

The Quick Fix

Why this is the case I have no good explanation.  One would at least think if the service was configured with the basicHttpBinding it would offer close to the same features of old.  Not the case though.  There is a big difference in the two obviously.  My first thought was to write a pluggin or some code that would provide the same functionality the old ASMX services do but I realized I had enough side projects to work on and I didn’t have the time.  Thus I was looking for a quick alternative to the problem.

The very first thing I did was open the Microsoft Service Configuration Editor and enable Message Logging in the Diagnostics folder.

image

With this enabled messages are written to the client or server.  It is a nice built-in feature that takes a lot more work with ASMX services.  With message logging enabled I ran my test service which added two numbers and then opened the message log using the SvcTraceViewer.exe.  SvcTraceViewer is part of the Windows SDK and does not ship with Visual Studio by the way.  Here are the messages generated in the log and viewed via the trace viewer.

image

This almost gave me the result I wanted.  Notice that it includes a lot of extra nodes and information.  The only nodes we care about start and end with <s:Envelope />.  This is our actual SOAP message.  If the trace option is enabled in WCF via diagnostics even more information is shown within this message.  I wanted to know the *exact* message that was going over the wire and back and I wanted to be able to look at it as I wrote my service or debugged it not having to launch a new tool.  Here is what I came up with.

The Programmatic Fix

WCF has tons of hooks and hooks mean extensibility.  My goal was simple.  I wanted to capture the request before it left my client and then capture the response message when it was received.  At first I thought this was going to be hard.  Then I stumbled upon an interface called IClientMessageInspector and my troubles were then over.

The first thing I did was create a class called MessageViewerInspector which implemented two interfaces.  The IClientMessageInspector and IEndPointBehavior.  Then I added two properties to my object which contained the request and response messages.  After that I implemented both interfaces with the object.  The IEndPointBehavior interface has four methods that need implementing but I only needed to use one which was ApplyClientBehavior.  In this method I added my MessageViewerInspector to the clientRuntime.   The IClientMessageInspector has two methods that need to be implemented which are the before and after.  This is where we get to see the messages before they leave the client and as soon as they come back.  Here is the complete object that will allow us to view our messages in WCF.

    /// <summary>
    /// Provides a custom behavior that allows a client to capture messages and log
    /// them or assist in debugging messages.
    /// </summary>
    public class MessageViewerInspector : IEndpointBehavior, IClientMessageInspector
    {
        
        #region Properties
        public string RequestMessage { get; set; }
        public string ResponseMessage { get; set; }
        #endregion

        #region IEndpointBehavior Members
        public void AddBindingParameters(ServiceEndpoint endpoint, System.ServiceModel.Channels.BindingParameterCollection bindingParameters)
        {

        }

        public void ApplyClientBehavior(ServiceEndpoint endpoint, ClientRuntime clientRuntime)
        {
            // adds our inspector to the runtime
            clientRuntime.MessageInspectors.Add(this);
        }

        public void ApplyDispatchBehavior(ServiceEndpoint endpoint, EndpointDispatcher endpointDispatcher)
        {

        }

        public void Validate(ServiceEndpoint endpoint)
        {

        }
        #endregion

        #region IClientMessageInspector Members
        void IClientMessageInspector.AfterReceiveReply(ref System.ServiceModel.Channels.Message reply, object correlationState)
        {
            this.ResponseMessage = reply.ToString();
        }

        object IClientMessageInspector.BeforeSendRequest(ref System.ServiceModel.Channels.Message request, IClientChannel channel)
        {
            this.RequestMessage = request.ToString();
            return null;
        }
        #endregion
    }

All that was left was to add this custom inspector to the proxy as an endpoint behavior and we can see our messages coming and going.

Here is the code I added to my sample console application to test.

    class Program
    {
        static void Main(string[] args)
        {
            MessageViewerInspector inspector = new MessageViewerInspector();

            ServiceReference1.Service1Client proxy = new ConsoleApplication1.ServiceReference1.Service1Client();

            proxy.Endpoint.Behaviors.Add(inspector);
            proxy.AddTwoNumbers(12332, 12323);
            proxy.Close();

            Console.WriteLine("Request message:");
            Console.WriteLine(inspector.RequestMessage);
            Console.WriteLine(String.Empty);
            Console.WriteLine("Response message:");
            Console.WriteLine(inspector.ResponseMessage);
            Console.ReadLine();
        }
    }

As you can see above I created an instance of my new inspector and then added it to my proxy class.  After my request ran I simply printed the messages to the console as seen here.

image

The really nice thing with this approach that I liked is I now have the ability to view the request and response objects by simply placing a break point in either the after or before methods in the inspector class.  For example, here is a QuickWatch of the request object:

image

Now that the basic plumbing is in place we can do all sorts of things.  For example if an exception is thrown we could now log the specific message that was requested to cause our client to throw an exception.  Of course this also solves my original problem of being able to grab the specific messages sent and received and works with all bindings supported.  I hope this helps. 

Generating WCF Proxy Class with Proper Namespace

Posted by Keith Elder | Posted in WCF | Posted on 16-08-2007

1

Since I wanted to move my generated proxy class generated by svcUtil to a separate C# Class Library project I ran into another problem after I figured out how to generate the collection type I wanted.  The problem I ran into was the namespace wasn’t correct.  At first there wasn’t a namespace.  I knew there was a namespace switch in the svcUtil.exe but the lack of documentation on it and examples left me scratching my head a few times.  Why people don’t include examples of every single switch is beyond me.  I guess I am too much of an educator to understand why simple things like that go undocumented. 

The namespace declared for the data contract in the WSDL was something like http://My.Namespace/ and  I wanted it to map to My.Proxy.  Here is the switch for svcUtil that gave me what I wanted.

svcUtil /n:http://My.Namespace/,My.Proxy

Of course combine this with the post from yesterday where I mapped the collection type of List<> and we are on our way to creating a pretty good proxy for the service. 

It Matters Where WCF Generates Your Proxy Class

Posted by Keith Elder | Posted in WCF | Posted on 15-08-2007

7

I just ran into a weird situation and I’m documenting it so I think I’m crazy later on.  I have the following method in a WCF service which basically returns a List<> of data contracts.


        public GetRuleSetsByCategoryIdResponse GetRuleSetsByCategoryId(GetRuleSetsByCategoryIdRequest request)

        {

            RuleSetLogic logic = new RuleSetLogic();

            List<RuleSet> ruleSets = logic.GetRulesByCategoryId(request.CategoryId);

            GetRuleSetsByCategoryIdResponse response = new GetRuleSetsByCategoryIdResponse();

            response.RuleSets = ContractTranslator.TranslateBetweenRuleSetDataContractAndRuleSet.TranslateRuleSetListToRuleSetDataContractList(ruleSets);

            return response;

        }

There is nothing weird or fancy about the service.  It just returns a collection of data contracts.  When I first generated the proxy for this service I added a service reference to the Winform project (right clicked project, add service reference).  The above collection of RuleSets got returned as a BindingList<RuleSetDataContract>.  To me that was weird, I had expected it to be RuleSetDataContract[].  Basically an array of objects.  It was weird but I lived with it whilst I was prototyping. 

Later as I fleshed my app out more I moved my proxy class into a C# class library all on its on.  When I generated the proxy class from a plain old C# class library class, the BindingList<RuleSetDataContract> collection was in fact replaced with an array of RuleSetDataContracts!   If someone cares to go deep on this and explain why you would get two totally different types of proxy classes generated for me I’m all ears.  Right now I’m in the coding zone and have to get done so let me leave you with my fix so I can get back to coding. 

In the end what I really wanted to deal with were generic lists (List<Object>).  Instead of using VS2005 to generate the file I shelled out to the Visual Studio command prompt and ran this command:

svcutil /d:. /noconfig /o:OrbbService.cs /r:DataContracts.dll /ct:System.Collections.Generic.List`1 http://localhost:57199/MyService.svc

Here is the break down of what these switches mean:

  • /d – working directory
  • /noconfig  – don’t generate the config file (duh)
  • /o – filename for generated code
  • /r – Used to specify assemblies that might contain types representing the metadata being imported
  • /ct – fully qualified name of the type to use as a collection data type when code is generated from schemas

By running the above command I now have everything the way I really want it with List<Object> for all of the return types.  Life is good.  I can now continue my regularly scheduled programming.