Welcome

You have reached the blog of Keith Elder. Thank you for visiting! Feel free to click the twitter icon to the right and follow me on twitter.

WCF NetMsmqBinding Error: The queue does not exist

Posted by Keith Elder | Posted in WCF | Posted on 14-01-2009

2

Hopefully me spending several minutes to write down a problem we recently ran into at work working with WCF and the NetMsmqBinding will save some of you a lot of time.  If you’ve landed on this page here is the error you might be seeing:

An error occurred while opening the queue:The queue does not exist or you do not have sufficient permissions to perform the operation. (-1072824317, 0xc00e0003). The  message cannot be sent or received from the queue. Ensure that MSMQ is installed and running. Also ensure that the queue is available to open with the required access mode and authorization.

There are a lot of things that can cause this error and it isn’t very descriptive.  Recently we were trying to deploy a service into our test environment and ran across this error. 

The issue was with the endpoint address.  Let me explain.

Let’s pretend our test server was named “wcftest”.  We had also created a host record in DNS that resolved to our application and configured our service in a virtual directory.  Let’s pretend that it was something like “http://MyApp/services/Msmq.svc”.  Here is the service configuration we were using.

   1: <service behaviorConfiguration="MyAppServiceBehavior"
   2:              name="MyAppService">
   3:                 <endpoint address="net.msmq://myapp/private/services/Msmq.svc"
   4:                  binding="netMsmqBinding" bindingConfiguration="msmqBinding" name="msmq"
   5:                  contract="IMyAppService" />
   6:                 <endpoint binding="mexHttpBinding" bindingConfiguration="" name="wsdl"
   7:                  contract="IMetadataExchange" />
   8:             </service>

First we checked to make sure we had a queue on the server named:  services/msmq.svc.   We did.

Secondly we looked at all the permissions on the queue and on the MSMQ service and everything was good. 

Because we were using the name of the host we had configured and setup in IIS we thought the endpoint address of the service was suppose to have the alias name in it (MyApp).  Turns out this was the problem.  Switching the address to the server name fixed the problem.  The change is:

net.msmq://wcftest/private/services/Msmq.svc

Thinking about it, it makes sense based on how MSMQ works (computer name to computer name).  It just isn’t something that jumped out at us instantly because the service was working on a development box, BUT, only because it was configured with the name of the machine and no alias.  Aha!

Workaround For WCF NetMsmqBinding Bug: The service ‘~/queue’ does not exist.

Posted by Keith Elder | Posted in .Net, WCF | Posted on 24-11-2008

10

There is an extremely nasty bug in WCF (Windows Communication Foundation) that I have discovered as of late.  I know it is a bug because after several weeks with an open support call into Microsoft it was confirmed as a bug.  It was so perplexing because it was hard to replicate.  It even took the .Net Framework developers a week or more to track it down.  Here’s a full blown error message:

An unhandled exception occurred and the process was terminated.

Application ID: /LM/W3SVC/2/ROOT

Process ID: 4428

Exception: System.ServiceModel.EndpointNotFoundException

Message: The service ‘~/unittestqueue’ does not exist.

StackTrace:    at System.ServiceModel.ServiceHostingEnvironment.NormalizeVirtualPath(String virtualPath)
   at System.ServiceModel.Channels.MsmqHostedTransportManager.HostedBindingFilter.MatchFound(String host, String name, Boolean isPrivate)
   at System.ServiceModel.Channels.MsmqBindingMonitor.MatchQueue(MatchState state)
   at System.ServiceModel.Channels.MsmqBindingMonitor.ProcessFoundQueues(MessageQueue[] queues, Dictionary`2 knownQueues, Boolean isPrivate)
   at System.ServiceModel.Channels.MsmqBindingMonitor.OnTimer(Object state)
   at System.ServiceModel.Channels.IOThreadScheduler.CriticalHelper.WorkItem.Invoke2()
   at System.ServiceModel.Channels.IOThreadScheduler.CriticalHelper.WorkItem.OnSecurityContextCallback(Object o)
   at System.Security.SecurityContext.Run(SecurityContext securityContext, ContextCallback callback, Object state)
   at System.ServiceModel.Channels.IOThreadScheduler.CriticalHelper.WorkItem.Invoke()
   at System.ServiceModel.Channels.IOThreadScheduler.CriticalHelper.ProcessCallbacks()
   at System.ServiceModel.Channels.IOThreadScheduler.CriticalHelper.CompletionCallback(Object state)
   at System.ServiceModel.Channels.IOThreadScheduler.CriticalHelper.ScheduledOverlapped.IOCallback(UInt32 errorCode, UInt32 numBytes, NativeOverlapped* nativeOverlapped)
   at System.ServiceModel.Diagnostics.Utility.IOCompletionThunk.UnhandledExceptionFrame(UInt32 error, UInt32 bytesRead, NativeOverlapped* nativeOverlapped)
   at System.Threading._IOCompletionCallback.PerformIOCompletionCallback(UInt32 errorCode, UInt32 numBytes, NativeOverlapped* pOVERLAP)


Ok, you see the error message above where it says the service ‘~unittestqueue` does not exist?  Well that queue DOES exist on the server but there isn’t a service mapped to that queue. 

The kicker to this is that I’m not even using the unittestqueue at all within my code.  This begs the question, why is a queue that I’m not even using showing up in my error list?  The netMsmqBinding I had configured used another queue called logEntries.  Here is the WCF configuration so you can see how this is configured.

   1: <system.serviceModel>
   2:         <serviceHostingEnvironment>
   3:             <baseAddressPrefixFilters>
   4:                 <add prefix="http://keithelder.net/"/>
   5:             </baseAddressPrefixFilters>
   6:         </serviceHostingEnvironment>
   7:         <client/>
   8:         <bindings>
   9:             <netMsmqBinding>
  10:                 <binding name="msmqBinding">
  11:                     <security mode="None">
  12:                         <transport msmqAuthenticationMode="None" msmqProtectionLevel="None"/>
  13:                         <message clientCredentialType="None"/>
  14:                     </security>
  15:                 </binding>
  16:             </netMsmqBinding>
  17:         </bindings>
  18:         <services>
  19:    <service behaviorConfiguration="LogEntriesBehavior"
  20:     name="KeithElder.MsmqService">
  21:     <endpoint address="net.msmq://keithelder.net/private/LogEntries"
  22:      binding="netMsmqBinding" bindingConfiguration="msmqBinding" name="msmq"
  23:      contract="KeithElder.ILogMsmqService" />
  24:     <endpoint binding="mexHttpBinding" bindingConfiguration="" name="wsdl"
  25:      contract="IMetadataExchange" />
  26:    </service>
  27:   </services>
  28:         <behaviors>
  29:             <serviceBehaviors>
  30:                 <behavior name="LogEntriesBehavior">
  31:                     <serviceMetadata httpGetEnabled="true"/>
  32:                     <serviceDebug includeExceptionDetailInFaults="false"/>
  33:                     <serviceThrottling/>
  34:                 </behavior>
  35:             </serviceBehaviors>
  36:         </behaviors>
  37:     </system.serviceModel>

The endpint is set to net.msmq://keithelder.net/private/LogEntries.  This means that messages received on this endpoint will be stored in the private queue logEntries.  Once stored, the messages call the method written in WCF to take the message from the queue and process it.  Really, this is all slick when it works and opens the door for a lot of scenarios. 

Obviously we aren’t supposed to be getting this error, especially about a queue WE AREN”T EVEN USING!

By the way, when this error occurs, it kicks off the jitdebugger and will slow your machine to a crawl.  It isn’t something fun to debug, trust me.

The Fix

If you have run into this error, and find this entry on my blog somehow, here is the workaround for this.  Again, this is a workaround, not optimal by any means.  There are two things you have to do (at least as far as I can tell with my testing).

Fix #1

Do not have any additional private queues other than the queue required for your service.  Obviously this has problems because other applications may be writing to private queues as well. 

Fix #2

Deploy the application to a virtual directory in IIS.  This is where I first started noticing the problem because I couldn’t get our test server to work when I deployed the code even though it worked on my machine. 

Fix #3 (added 12/3/2008)

Support from Microsoft said you can do one or the other, but I am still getting errors in the event log even though the application is deployed in a virtual directory with two private queues.  If I delete all queues and have it deployed in a virtual directory things are happy.  Changing the endpoint to the name of the path of the service does fix the problem and allows multiple queues to be on the machine.  I’ve tested this extensively.  Here’s an example:

image

So instead of having the queue named “LogEntries”, changing it to “myvirtualapp/service.svc” fixed the problem and things work normally.

Official Fix

I was told by Microsoft Support this bug would be fixed in the next service pack and also the .Net Framework 4.0. 

Creating a REST WCF Service From an Existing XSD Schema

Posted by Keith Elder | Posted in .Net, Asp.Net, WCF, Web Services | Posted on 02-11-2008

5

A reader of this blog sent me an email asking the following question:

“I have an XSD that I am required to use to export my company’s data. How can I use that XSD and return data to them in a web method? I should be able to return a data set with the information formatted the way the XSD defines but I have no idea how to do that. Any ideas would save me a ton of time and grief!”

Turns out this is a really good question, and I think one a lot of developers struggle with primarily because the majority of developers are scared of XSD schemas.  Hopefully I can change that.  An XML Schema is really simple and it is your friend. 

What is an XSD or Xml Schema Definition?

An XML Schema describes the structure of an XML document.

That’s it, see, it isn’t that hard after all!

As a developer think of an XSD the same way you would when creating business rules to validate objects before storing them into a database.  Some items in objects cannot be null, some can.  Some need to have their data formatted (email address for example) and others need to not exceed certain lengths, etc. 

When dealing with an XML document, we need to apply the same type of rules and this is where the XSD comes in.  Once we have an XSD to describe an XML document we can guarantee any XML data we receive conforms to these rules.

Ok, enough intro, let’s get coding.

The Schema

In the case of the reader’s question, an XSD schema already existed.  To save time, I’ve taken then general idea of the schema I was sent and slimmed it down for simplicity sakes.  The schema represents an XML document that will contain job listings. Here is a view of the schema from the schema explorer in Visual Studio as well as the schema itself (again slimmed down).

   1: <xsd:schema
   2:   xmlns:xsd="http://www.w3.org/2001/XMLSchema"
   3:   targetNamespace="http://keithelder.net/Jobs"
   4:   xmlns:xs="http://keithelder.net/Jobs">
   5:  
   6:   <xsd:complexType name="JobListing">
   7:     <xsd:sequence>
   8:       <xsd:element maxOccurs="unbounded" minOccurs="1" name="job" type="xs:Job" />
   9:     </xsd:sequence>
  10:   </xsd:complexType>
  11:  
  12:   <xsd:complexType name="Job">
  13:     <xsd:sequence>
  14:       <xsd:element maxOccurs="1" minOccurs="1" name="Title"  type="xsd:string"></xsd:element>
  15:       <xsd:element maxOccurs="1" minOccurs="1" name="Description" type="xsd:string"></xsd:element>
  16:       <xsd:element maxOccurs="1" minOccurs="1" name="Location" type="xs:Address"></xsd:element>
  17:       <xsd:element minOccurs="0" maxOccurs="1" name="PostingDate" type="xsd:date"></xsd:element>
  18:       <xsd:element minOccurs="0" maxOccurs="1" name="CloseDate" type="xsd:date"></xsd:element>
  19:       <xsd:element minOccurs="0" maxOccurs="1" name="Benefits" type="xsd:string"></xsd:element>
  20:       <xsd:element maxOccurs="1" minOccurs="1" name="Salary"  type="xsd:string"></xsd:element>
  21:       <xsd:element maxOccurs="1" minOccurs="0" name="JobType" type="xs:JobType"></xsd:element>
  22:       <xsd:element minOccurs="0" maxOccurs="1" name="Function" type="xs:JobFunction"></xsd:element>
  23:       <xsd:element minOccurs="0" maxOccurs="1" name="Category" type="xs:JobCategory"></xsd:element>
  24:     </xsd:sequence>
  25:   </xsd:complexType>
  26:  
  27:   <xsd:simpleType name="JobType">
  28:     <xsd:restriction base="xsd:string">
  29:       <xsd:enumeration value="full-time"></xsd:enumeration>
  30:       <xsd:enumeration value="part-time"></xsd:enumeration>
  31:       <xsd:enumeration value="contractor"></xsd:enumeration>
  32:     </xsd:restriction>
  33:   </xsd:simpleType>
  34:  
  35:   <xsd:complexType name="Address">
  36:     <xsd:sequence>
  37:       <xsd:element minOccurs="0" maxOccurs="1" name="Street" type="xsd:string"></xsd:element>
  38:       <xsd:element minOccurs="0" maxOccurs="1" name="City" type="xsd:string">   </xsd:element>
  39:       <xsd:element minOccurs="0" maxOccurs="1" name="Country" type="xsd:string"></xsd:element>
  40:     </xsd:sequence>
  41:   </xsd:complexType>
  42:  
  43:   <xsd:simpleType name="JobCategory">
  44:     <xsd:restriction base="xsd:string">
  45:       <xsd:enumeration value="Automotive"/>
  46:       <xsd:enumeration value="Banking"/>
  47:       <xsd:enumeration value="Construction"/>
  48:       <xsd:enumeration value="Internet"/>
  49:       <xsd:enumeration value="Retail"/>
  50:       <xsd:enumeration value="Services"/>
  51:     </xsd:restriction>
  52:   </xsd:simpleType>
  53:  
  54:   <xsd:simpleType name="JobFunction">
  55:     <xsd:restriction base="xsd:string">
  56:       <xsd:enumeration value="Chief Peanut Butter Spreader"/>
  57:       <xsd:enumeration value="I ran the whole ship"/>
  58:       <xsd:enumeration value="Other"/>
  59:     </xsd:restriction>
  60:   </xsd:simpleType>
  61: </xsd:schema>

image

Once we have a schema defined like this we can generate code to be used for a service.  We have a tool at our disposal that is available within the Visual Studio Command Prompt called XSD.exe.  This executable does a lot of things but one thing it can do is generate code from an XML Schema Definition. 

When generating from the XSD file I was sent there was a problem with it.  Here is the walk through of that story so you can follow along. 

image

When I first tried this on the reader’s original XSD I got an error:

Warning: cannot generate classes because no top-level elements with complex type were found.

What does this mean?  Well, look at the screen shot of the XML Schema Explorer above.  Do you see the <> green icons?  Well those represent an XML Element.  An element is a fancy name for an XML tag like:  <Cows>Bramar</Cows> 

Let me roll this up and take another screen shot so you can start to see the problem (i have to hit my magic number of 12 screen shots anyway 🙂 ).

image

See the problem?  There isn’t an element in this schema (no green <> thingy).  What this means is we have a schema which just lists complex types of elements and enumerations.  There isn’t any “xml” in this schema.  The fix is simple though.  Add an element to the schema. 

   1: <xsd:element name="JobListing" type="xs:Job" />

Now we have a green thingy icon which means this XSD contains at least one element.  Basically think of the JobListing element as the root element.

image

Now that we have an element we can generate a C# class file from this XSD:

image

The code generated is about 350 lines so I’m not going to include it in the article.  There are some nice things happening for us when the C# classes are generated using xsd.exe. For starters the enumerations in the XSD are turned into C# enumerations.  The classes are marked serializable and they have the appropriate XML attributes on the properties to serialize these objects into XML.  This is a good thing since it means we didn’t have to create it.  Code generation is your friend.  Now that we have C# objects we can serialize these to XML easily. 

The Service

The first thing we need to do is create the WCF service.  For this example I chose to create a WCF Service Application in Visual Studio 2008.  After the project is initialized, the first thing we need to do is define the contract for the service.  In other words, what is coming in and going back out.  Since we have generated our code using the XSD utility we are going to use the XmlSerializer with our service.  The reason is this will make sure our XML formatted the way we intended.  While we are at it, I’ve made the service a RESTful type of service.  Here is the contract.

   1: [ServiceContract]
   2: public interface IJobService
   3: {
   4:  
   5:     [OperationContract]
   6:     [XmlSerializerFormat]
   7:     [System.ServiceModel.Web.WebGet(UriTemplate="/jobs/{type}", RequestFormat=WebMessageFormat.Xml)]
   8:     List<Job> GetJobListings(string type);
   9: }

The contract above has one method GetJobListings().  This method has two additional attributes.  One, the attribute to mark the method to serialize using the XmlSerializer and two the attribute to turn the method into a RESTful service.  In other words our service can be accessed like this:

http://localhost/service.svc/jobs/full-time

Now that the contract is setup, we just need a class to implement this contract on.  Here’s a quick and dirty implementation.

   1: public class Service1 : IJobService
   2: {
   3:  
   4:     #region IJobService Members
   5:  
   6:     public List<Job> GetJobListings(string type)
   7:     {
   8:         return GetJobs();
   9:     }
  10:  
  11:     private static List<Job> GetJobs()
  12:     {
  13:         var jobs = new List<Job>();
  14:         jobs.Add(new Job { JobType= JobType.parttime, Category = JobCategory.Banking, Benefits= "You are on your own.", Description="I did something" });
  15:         jobs.Add(new Job { JobType= JobType.fulltime, Category = JobCategory.Banking, Benefits= "You get something." });
  16:         jobs.Add(new Job { JobType= JobType.contractor, Category = JobCategory.Banking, Benefits= "Times are tuff, deal with it." });
  17:         jobs.Add(new Job { JobType= JobType.fulltime, Category = JobCategory.Banking, Benefits= "How does $700 billion sound?" });
  18:         return jobs;
  19:     }
  20:     #endregion
  21: }

Now all we have left is to get this working is to configure WCF to support our RESTful implementation.  In order to do this we are going to use the webHttpBinding.  Here is the WCF configuration to implement our RESTful service.

   1: <system.serviceModel>
   2:   <bindings>
   3:     <webHttpBinding>
   4:       <binding name="rest" />
   5:     </webHttpBinding>
   6:   </bindings>
   7:   <services>
   8:     <service behaviorConfiguration="WcfService1.Service1Behavior"
   9:      name="WcfService1.Service1">
  10:       <endpoint address="mex" binding="mexHttpBinding" name="wsdl"
  11:        contract="IMetadataExchange" />
  12:       <endpoint address="" behaviorConfiguration="NewBehavior" binding="webHttpBinding"
  13:        bindingConfiguration="" name="web" contract="WcfService1.IJobService" />
  14:     </service>
  15:   </services>
  16:   <behaviors>
  17:     <endpointBehaviors>
  18:       <behavior name="NewBehavior">
  19:         <webHttp />
  20:       </behavior>
  21:     </endpointBehaviors>
  22:     <serviceBehaviors>
  23:       <behavior name="WcfService1.Service1Behavior">
  24:         <serviceMetadata httpGetEnabled="true" />
  25:         <serviceDebug includeExceptionDetailInFaults="false" />
  26:       </behavior>
  27:     </serviceBehaviors>
  28:   </behaviors>
  29: </system.serviceModel>

That’s it, we are all setup.  Now all we have to do is launch the service and browse to the URL we outlined earlier to get our results.

image

This may seem like a lot of steps but it really isn’t.  I encourage you to take this example and play with it.  You can download the solution below.

Download Solution WcfService.zip

WCF vs ASMX WebServices

Posted by | Posted in .Net, WCF | Posted on 17-10-2008

77

This question comes up a lot in conversations I have with developers. 

“Why would I want to switch to ASMX services?”

One analogy I have come up with to explain the difference between the two is an airplane analogy. 

I associate ASMX services with a Cessna 150 cockpit and I associate WCF services with a 747 Jumbo Jet cockpit. 

image

I’ll be honest, I’ve never flown a plane but I think I’m smart enough to crank a Cessna 150 if I had to figure it out.  The above screen shot is a real Cessna 150 cockpit.  There are a few gauges, some knobs, etc.  Really not that bad.  And I think this explains ASMX really well.  ASMX services are easy to crank and jump start.  Think about it.  We take an existing Asp.Net website and add a file called “asmx”.  Any method we attribute with [WebMethod] magically turns into a service.  Objects we pass in and pass out that have public getters and setters will be serialized into XML.

   1: [WebMethod]
   2: public string FlyToDestination(Location loc)
   3: {
   4:     // up up and away
   5: }

The barrier to cranking and getting going with an ASMX service is really simple.  And because it is simple, we’ve adopted them on a massive scale.  Let’s turn our attention to WCF.

image

WCF is a jack of all trades.  Think of it like a large plane that can repurposed for hauling passengers, hauling cargo, military use or whatever.  We are dealing with a plane but it is all about how that plane is configured.  Because things can be configured a lot of ways with the WCF 747 plane there are a lot more buttons in the airplane cockpit as compared to the Cessna 150.  The flip side of this is that once you understand how to configure WCF you’ve got one of the most versatile plane in the world!

From a developers stand point, the same logic or code written in an ASMX service works in WCF.  The code between the curly braces is the same.  The bottom line in either case is a method gets called and an object gets passed in (we call this a message when talking about services).  The difference in WCF is we program to a specific contract.  Here’s the same example above done in WCF.

   1: [ServiceContract]
   2: public interface IAirportService
   3: {
   4:     [OperationContract]
   5:     string FlyToDestination(Location loc);
   6: }
   7:  
   8: public class AirportService : IAirportService
   9: {
  10:     
  11:     public string FlyToDestination(Location loc)
  12:     {
  13:         // up up and away
  14:     }
  15: }

Instead of attributing the specific method like we do in ASMX, in WCF we attribute the Interface.  Programming to an Interface is a good thing and the reason this is done is to loosely couple the host of the service from the implementation.  Doing this opens the door for hosting WCF services not only in IIS but console apps, Winforms, WPF, etc.  Since we’ve programmed to a contract (which is just an Interface), any class that implements the Interface can be a service.  This is powerful.  This is powerful because how we expose this service is up to us (again it is all about configuration).  Because we can expose our AirportService a number of ways we can see that WCF provides developers the ability to write code once and repurpose their code as needed. 

image

Exposing a WCF service requires a little more training from this point forward ( just like flying a 747) because we have to understand how to configure the service.  It is this little bit of extra effort required to understand WCF configuration that stops a lot of developers from using WCF.  This is a shame because when the developer using ASMX wants to guarantee message delivery, participate in transactions, or use binary serialization instead of XML, they’ve got a lot of work ahead of them as compared to WCF.   

The moral of the story is ASMX is simple and because it is simple, it isn’t very powerful.  Take the time to learn about WCF because this is the future of the .Net platform, thus it will be time wisely spent.  If you’ve been holding back I encourage you to step out of your old ASMX habits and learn the ways of WCF. 

If you would like to dig a little deeper with WCF I encourage you to check out my “Demystifying Windows Communication Foundation” power point.  In there you’ll find a lot more details about how WCF works.

http://keithelder.net/Presentations/DemystyfyingWCF/DemystifyingWindowsCommunicationFoundation.ppt

Happy messaging.

Configuring WCF and IIS 7 With HTTP Bindings and Multiple Host Headers

Posted by Keith Elder | Posted in .Net, WCF | Posted on 28-04-2008

27

If you’ve tried to deploy Windows Communication Foundation (WCF)  in a production environment the odds are you have come across this error at one point or another:

This collection already contains an address with scheme http.  There can be at most one address per scheme in this collection. Parameter name: item

It is one of those lovely errors that should have been gumped down before it made it into production code but for some reason the developer who wrote it thought they’d sound smarter if they obfuscated the problem to confuse everyone.  No fear, I’m hear to clear this up and gump it down to save you endless hours of time. 

The Problem

In multiple shared hosting environments or even in the enterprise where load balancers are used it isn’t uncommon to have a single machine answer to multiple host names.  This is typically the problem that causes the error above since IIS has more than one http binding configured to answer requests for a given web site.  To simulate this I am going to walk you through how to create a fake configuration so your local development machine answers to more than one host name.  Then I’ll walk you through how to configure IIS7 to deploy a WCF service to your local machine using one name, and then break the deployment to simulate the error above.  After that we’ll fix it.

Here is the overall goal of the walk through. 

  1. Configure our machine to answer multiple host names
  2. Setup IIS to support our application
  3. Deploy the sample WCF application
  4. Add the second host name to break the deployment
  5. Apply the fix

Requirements

A few months ago I did a walk through on how to configure WCF with multiple bindings.  We are going to take that example and deploy it into IIS.  I’ll be deploying this solution on Windows Vista SP1 using IIS7.  Even if you are using Windows Server 2008 the same setup should be similar.  If you haven’t read the previous article on multiple bindings please do so.  At the bottom of the article download the sample solution, this is what we’ll be deploying if you want to follow along.

Configuring Extra Host Headers

Edit hosts file to add fake names

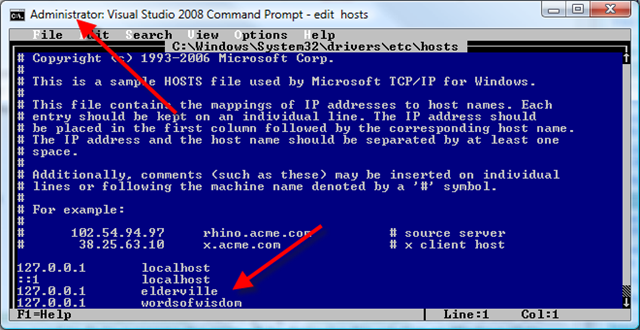
More than likely if you are performing this setup on a developer machine for testing you’ll need to create several fake host names for your machine.  To do this, open the following file c:\windows\system32\drivers\etc\hosts and add in a few fake names.  For this example I’m going to add two additional host names for my machine so it answers to the names of “Elderville” and “WordsOfWisdom”.  You can obviously choose what you want.  Here are the two entries I am going to add to my hosts file.

image

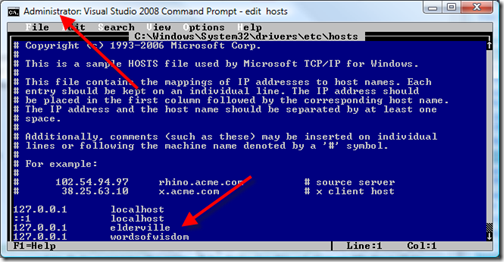
Note that you will need to be administrator to add these lines to this file.  The lines added resolve to the localhost IP address which is 127.0.0.1.  After these names are added you should be able to ping these host names and get a response.

image

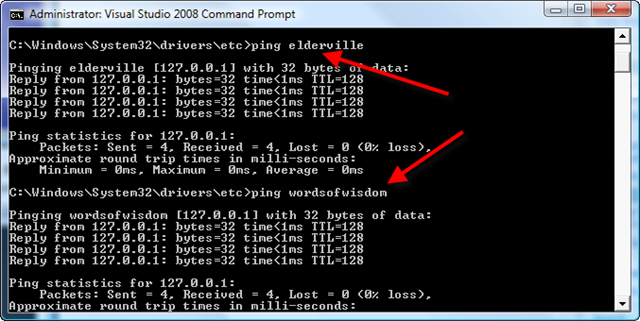
Locally the computer now responds to two additional host names:  elderville and wordsofwisdom.

Initial IIS7 Configuration

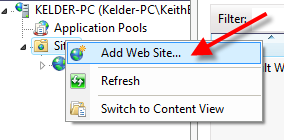
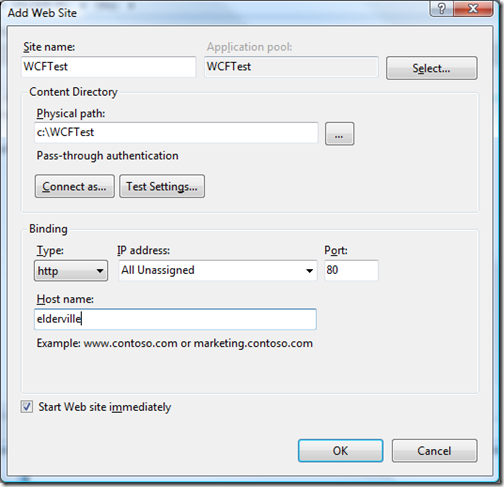
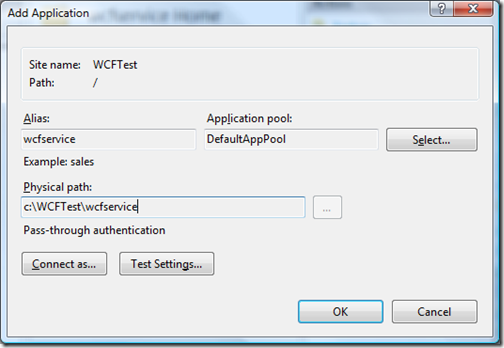
In order to deploy our sample WCF service we need to have a location pre-configured.   Create the following path on your hard drive called C:\WCFTest\wcfservice.  Once created, open Internet Information Services manager as administrator and right click the sites folder to add a new web site.

image

Create a new web site to deploy the WCF service and use the path we just created to deploy the service.  I’m going to configure the service to answer using the host name of elderville.

image

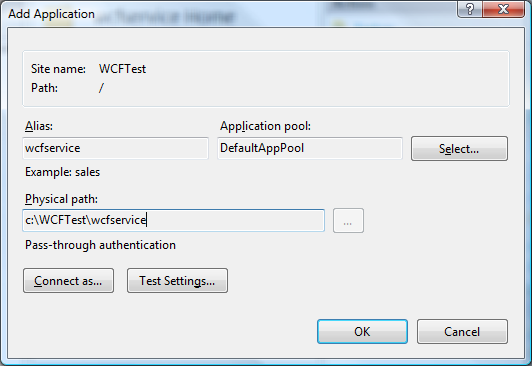
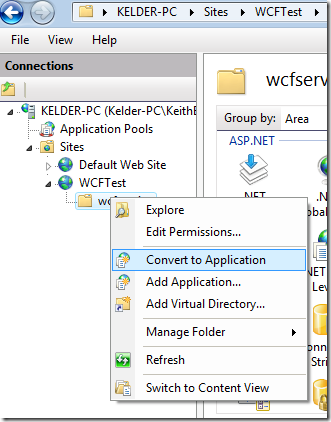
After the site is created, convert the “wcfservice” folder into an application.

image

image

This is as far as we need to go as this moment with IIS.  We’ll come back to IIS7 configuration in a bit so leave it open if you are following along.  Right now we just want to deploy the service and make sure it works.

Deploying Our Sample WCF Service

Unzip the sample solution and open the solution in Visual Studio 2008.  In order to prepare the service for deployment the only change we need to make is to change the address of the endpoints.  There are three endpoints this service exposes: WsPlain, Basic and WsSecured.  The first endpoint of WsPlain doesn’t have an address listed in the endpoint properties.  This means it takes the endpoint address it is deployed within.  Each endpoint must have a different address so to get around this we are going to use relative addresses. 

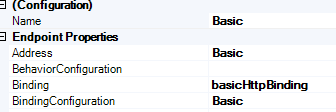
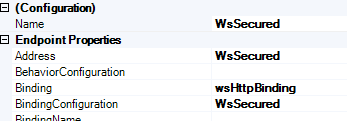
Open the WCF Configuration Editor by right clicking the web.config file in the project and change the address of the Basic and WsSecured endpoints to the same name.  Here’s what they should look like after you make the change.

image

image

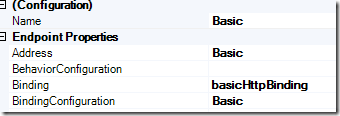
Using relative addresses appends the string in the address field to the end of our service address therefore making a different address location for each endpoint.  For example.  Since we are deploying our service as http://elderville/wcfservice/service.svc, the basic endpoint address will get converted to http://elderville/wcfservice/service.svc/Basic

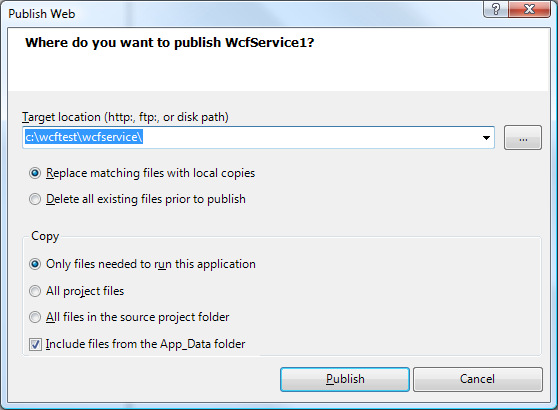
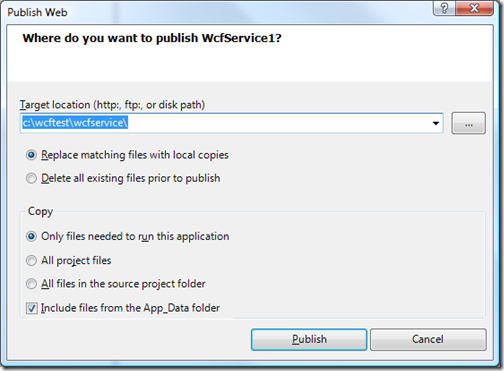
This is the only change that is needed to deploy this service.  Now right click the WCF project and click “Publish”.  Set the target location to c:\wcftest\wcfservice as seen below and then click publish.

image

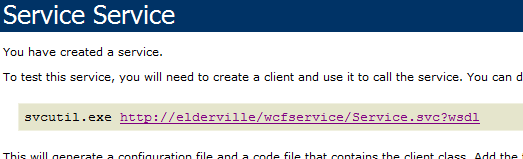
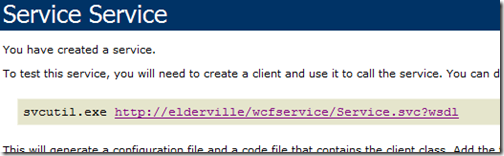
Open Internet Explorer and browse to the following URL:  http://elderville/wcfservice/Service.svc.  You should see your service page.

image

Reconfigure Windows Test App

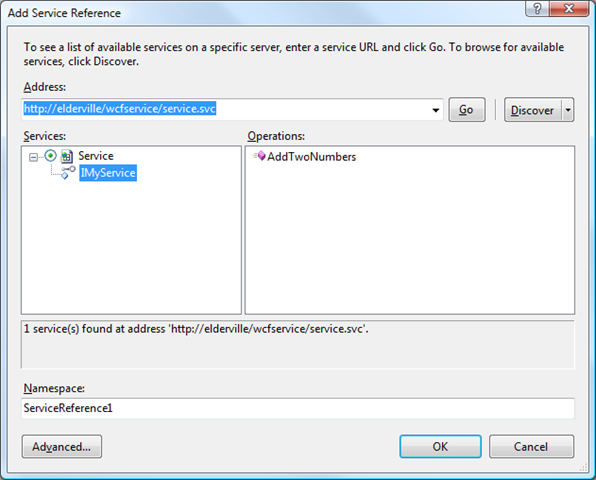
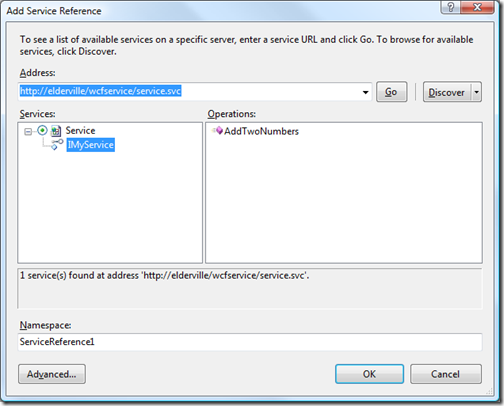
To test the service, remove the existing service location from the Windows test project included in the solution.  Open the app.config file and remove the existing WCF client information (leave just the configuration xml elements).  Right click on the service reference within the project and paste the new address into the address field then press go.  Once it loads the service, press OK to add the reference to the project.

image

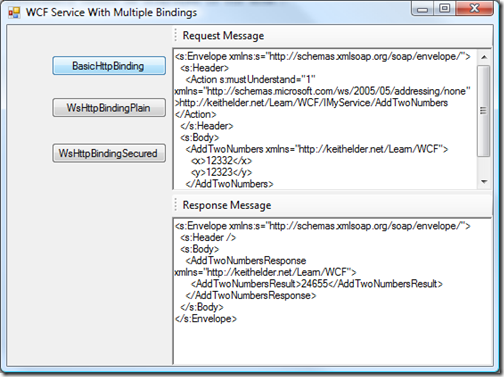
Next launch the Windows Application and click on the binding buttons to see the messages going back and forth with your service. 

image

At this point we’ve just setup IIS7 and deployed a WCF service.  Steps 1-3 are now complete.  Now let’s apply a more real world scenario to see what happens.

Breaking The Deployment

Based on our original goals we are now going to break this deployment. This is the real heart of this problem as this simulates a more real world example. 

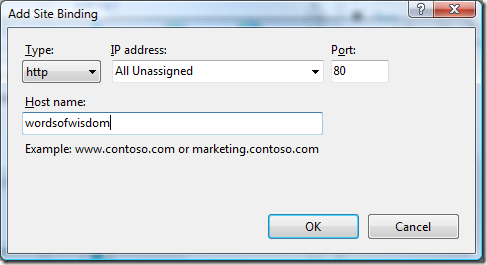
To break this deployment we are going to add the second host name to the WCFTest site we created.  This is simulating is a shared hosting environment or an enterprise setup where load balancers are used.  Since I created “wordsofwisdom” as my secondary host name I am going to add that as an additional HTTP binding on the application.  This means my application will now answer to two names.

In the IIS7 configuration manager right click the application and edit the bindings.

image

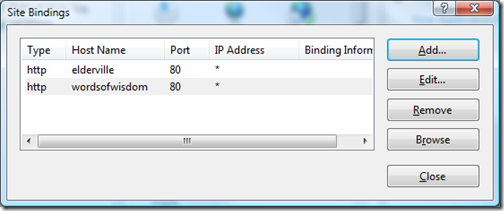
The site’s configured bindings should only have one binding enabled which is the original host name entered when the site was originally configured.

image

Click add and enter the second host name the computer will answer as.  I entered the secondary host name of “wordsofwisdom”.

image

Press OK and both names should appear within the site bindings list. 

image 

To recap what we just configured, we setup IIS7 to answer requests for both of our host names.  Again this isn’t uncommon to have this type of configuration.

Now open the browser and browse to the previous working service.  You should see the error now.

This collection already contains an address with scheme http.  There can be at most one address per scheme in this collection. Parameter name: item

Since there are two names in the HTTP binding section it doesn’t know which one is the correct name to answer and thus the WCF service throws an exception. 

Fixing the Deployment

Depending on the .Net framework you are using the fix is different.  If you are using .Net 3.0 the only thing you can do to fix this is write a WCF custom ServiceHostFactory.   This work around is a little ugly and not something easy to standardize.  My suggestion is to upgrade to .Net 3.5 and take advantage of a new configuration option added in .Net 3.5 to solve this exact problem. 

The fix for .Net 3.5 uses a  new configuration element called <baseAddressPrefixFilters>

Represents a collection of configuration elements that specify pass through filters, which provide a mechanism to pick the appropriate Internet Information Services (IIS) bindings when hosting the Windows Communication Foundation (WCF) application in IIS.  A prefix filter provides a way for shared hosting providers to specify which URIs are to be used by the service. It enables shared hosts to host multiple applications with different base addresses for the same scheme on the same site.

To apply this fix open the web.config file for the service within Visual Studio and within the <system.serviceModel> tags add the following XML:

<serviceHostingEnvironment>
    <baseAddressPrefixFilters>
        <add prefix="http://elderville/wcfservice"/>
    </baseAddressPrefixFilters>
</serviceHostingEnvironment>

Once these lines are added, redeploy the service and refresh the service in the browser.  The error should be gone!

Conclusion

In this walk through we’ve covered a lot!  We walked through how to configure IIS7 and deploy an existing WCF service.  We also looked at the scenario that causes the error that a lot of developers run into when deploying WCF services in various environments.  The moral of this story is be safe and go ahead and plan on adding the baseAddressPrefixFilters tag into your web.config files from now on since you never really know how administrators will configure their servers. 

I hope you enjoyed this walk through.