Welcome

You have reached the blog of Keith Elder. Thank you for visiting! Feel free to click the twitter icon to the right and follow me on twitter.

IE8 Download Notification in Windows 7

Posted by Keith Elder | Posted in Internet, MVP10, Windows | Posted on 15-09-2009

3

Ever started a download and then wondered how much time it had before it finished?  Me too.  I just noticed this feature in the new taskbar of Windows 7 on the Internet Explorer 8 icon. 

Zune 4.0 was just released so I kicked off a download.  A few minutes later I was wondering how far along it was. 

I happened to glance down at the task bar in Windows 7 and noticed this:

image

The Internet Explorer 8 icon was filling up, moving to the right as the download progressed. Here is typical download window.  Very cool and something I hadn’t noticed before nor seen anyone mention on the Internets.

image


Good to know and a nice use of the new task bar, I mean dock, I mean task bar in Windows 7.

Setup Windows 7 Quick and Easy with VMWare’s Easy Install

Posted by Keith Elder | Posted in Windows | Posted on 12-09-2009

1

Did you know you can have a brand new version of Windows 7 up and running within minutes in VMWare?  Here’s how. 

I run VMWare for all of my virtual machines.  Yes I know Windows 7 has native VHD support but honestly I don’t need to boot a VM on my main desktop.  I have plenty of horse power to comfortably run a VM (12GB’s of memory, fast drives, 4 monitors).

If you are running VMWare 6.5 you are only a few minutes away from having Windows 7 running in a VM and then only a few more minutes away from running VS2008 or a beta release of VS2010. 

The feature is called “Easy Install” and is similar to how ESX server can do quick installs.

Easy Install Feature for Some Guest Operating Systems

The easy install features enable you to perform an unattended installation of the guest operating system after you complete the New Virtual Machine wizard. You can use this feature regardless of whether you choose a typical or a custom configuration in the wizard.

If you specify an installer disc or image (.iso) file and if the wizard detects an operating system that supports the easy install feature, you are prompted to supply the following information:

For Windows guests:

  • (Optional) Windows product key – If you specify a product key, you are not prompted for it later, during installation of the operating system. Enter a product key unless the installation media already contains a volume license product key.
  • Full name – This name is used for registering the operating system. Do not use the name Administrator or Guest. If you use one of these names, you will receive an error message during installation of the operating system and be prompted to enter a different name.
  • (Optional) Password – On Windows operating systems other than Windows 2000, the password you enter here is used for an account with Administrator permissions. On Windows 2000, the password you enter here is used for the Administrator account.

For Linux guests:

  • Full name – This name is used for registering the operating system, if registration is required. The first name is used as the host name for the virtual machine.
  • User name – You can use lowercase letters and numbers, with no spaces. Do not use the name root. Some operating systems set up sudo access for this user, and some require this user to use su to get root privileges.
  • Password – The password you enter here is used for both the user name you supply and the root user.

The easy install feature is available for newer Windows operating systems and several Linux operating systems. The installation media that you can use include operating system installation CDs, DVDs, and ISO images.

This feature also installs VMware Tools in the guest operating system. For more information about VMware Tools, see Components of VMware Tools.

If you plan to use a CD, DVD, or ISO image that contains a product key number and is already set up to perform an unattended installation, the only benefit you gain by using the easy install feature is the automatic installation of VMware Tools.

Here is what it looks like when it detects the operating system. 

image

While the ISO I pointed to is Windows 7, VMWare detected it as Vista x64.  I proceeded and it worked fine.  Go ahead, it’ll be ok.  Trust me!

The next screen is interesting because it asks for your windows product key.  The name you enter into the “Full Name” field will become your username so choose wisely.  I would also suggest setting a password.

image

The next step is to name the new VM and select a location.

image

Next select disk capacity.

image 

When you press “finish” below, just sit back and relax.

image

Here we go!  Start the timer.

image

Files are automatically starting to copy after 50 seconds in.

image

2 minutes and 28 seconds in I am at 35%. 

image

5 minutes and 39 seconds into install we have rebooted and setting up registry.

image

6 minutes into the install we are already completing installation.

image

Another reboot at 7 minutes and 29 seconds.

image

Total time to have a full bootable machine 8:29 thus far. 

image

A quick login and the VMware tools automatically install.

image

We reboot again after the VMWare install at 9 minutes and 42 seconds after we started. 

At exactly 10 minutes and 25 seconds after starting we have fully booted into a full blown Windows 7 installation. 

image

Ten minutes and 25 seconds from start to finish is awesome.  The only thing I had to do is login.  The easy install took care of everything else. 

From here I would highly suggest creating a full clone or a linked clone.   Don’t touch this image!  If you use linked clones you can rubber stamp out this image over and over install test software and other things.

See my previous article on how I handle cloning and base VMWare images.

MSDN / Technet Subscribers Get Windows 7 July 13th

Posted by Keith Elder | Posted in Windows | Posted on 03-07-2009

3

It is official, it is Christmas in July for many MSDN / Technet subscribers.  The official RTM version of Windows 7 will be available for download on MSDN / Technet on July 13th. 

Wait… I thought it was supposed to be released on October 22nd?

The October 22nd date is the date it will be available in stores.  The July 13th release is the same version that will be cut to the manufacturers.  It takes the manufacturers time to get their stuff in order so units can start shipping (usually about 3 months).   Thus pending any major bugs, the July 13th release is the official version.

The official story broke at http://geeksmack.net/microsoft/438-confirmed-windows-7-to-rtm-july-13th.html and then got picked up by http://www.neowin.net/news/main/09/07/03/confirmed-windows-7-set-to-rtm-on-july-13th

Tethering iPhone 3G on Windows 7

Posted by | Posted in Mobile Devices, Windows | Posted on 22-06-2009

45

DISCLAIMER

Doing this is not supported by AT&T and other wireless carriers.  Consult with your carrier before following these instructions. 

Tethering iPhone 3G

Folks, it is here, and it is a reality!  I am writing this blog article from Windows 7 tethered to my notebook via an iPhone 3g.  The best part of all is you don’t have to jail break the phone to do it.  For the record I am using an AT&T locked, non-hacked, standard iPhone.  Nothing has been done to this phone in anyway whatsoever.  Here is what you need to get this setup and working. 

Latest Updates

Be sure you have iTunes version 8.2 installed and then get the latest version of the iPhone OS, version 3.0. 

Install MobileConfigs

After the phone is updated to the latest firmware and version of iTunes go to http://help.benm.at from your iPhone. 

Follow the on screen settings to find your country, provider and so on.  Once the MobileConfig is download go into “Settings->General->Network” on your iPhone and enable tethering. 

Windows 7

Now connect the phone to your computer and a new driver will install.  You can find it in the control panel under Network called “Apple Mobile Device Ethernet”. 

image

That’s it, you should be online and tethered now.  I bet you expected a really long-winded process?  Nope, it is too simple.

New Hardware: Running Windows 7 With Four LCDs

Posted by Keith Elder | Posted in Computer Hardware, Windows | Posted on 22-06-2009

3

For years I’ve had two monitors on my computers.  Working at home every day in and day out has reminded me that two just isn’t enough.  I find myself constantly flipping between windows and applications, especially since all the development I do is virtualized.  At work we recently upgraded the majority of our developers with new Core i7 machines with two 22inch LCDs.  Since I already had my own machine I asked if I could just get two of the new LCDs.  A few days later two new Dell 22inch LCDs showed up at my house. 

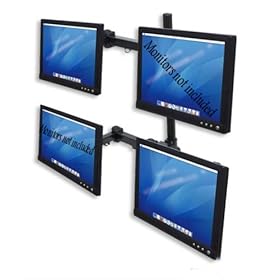
Planning for their arrival I found out we use Humanscale M7 monitor stands at work.  M7’s aren’t cheap retailing for about $500.00.  That was out of my price range to get all four LCDs setup.  After hours of digging around I finally found a quad LCD monitor arm I was comfortable purchasing and it was only $88.00!  Here’s what I settled on:

Quad LCD Monitor stand Fully adjustable New

The product is sold by Tyke Supply on Amazon and is manufactured by http://diwei.com/.  There really wasn’t much to go on to decide if this product was going to hold up and be sturdy enough but I pulled the trigger.

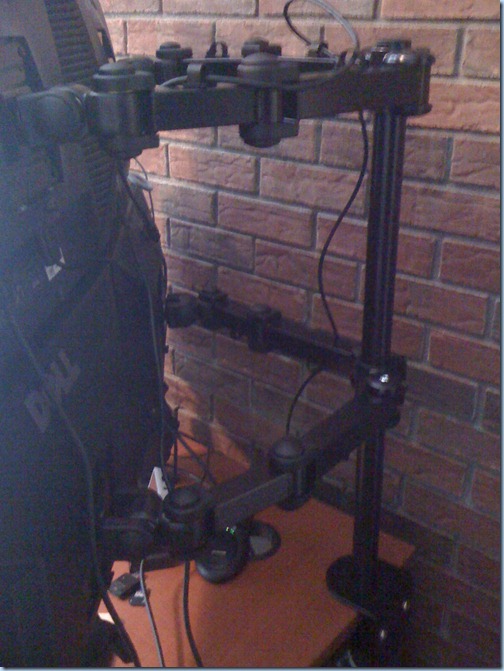
When the product arrived the first thing I noticed was how heavy it was.  As soon as I unpacked it I realized I had a winner.  The arms of the unit are extremely well built, very heavy aluminum.  It even came with an alum wrench to tighten things down. 

One word of caution is make sure you have someone to help you setup the unit.  This is not a one man job as it takes one person to hold the screens while the other person tightens them down on the pole. 

I was extremely surprised how sturdy the unit is once installed.  It doesn’t move once tightened down at all.  As long as you have a hang over on your desk you can install this unit.  As you can see below, it slid right onto my over hang. 

IMG_0091

Windows 7 allowed me to easily configure the screens how I wanted them.

image 

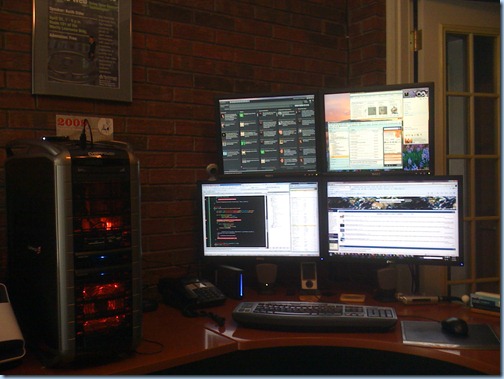
And of course, you have to see all of this screen real estate from the front or this blog post wouldn’t be complete.

IMG_0092

The two LCDs on top were my previous Dell 19inch LCDs I purchased from the Dell refurb store several years ago and the bottom two are the new Dell 22inch LCDs work sent me.  If you are curious as to what is where on all of the screens here is what is running where right now (subject to change):

  • Top Left – TweetDeck
  • Top Right – Windows 7 gadgets, live messenger, pandora, email
  • Bottom Left – VMWare Windows Server 2008 virtual machine (work)
  • Bottom Right – Browser, Explorer, FeedDemon, Live Writer
  • I’ve only had this configuration for a couple of days and with so many screens and windows open I can honestly say that the new features of split screens, Aero Peek and others in Windows 7 make it incredibly easy to get around.

    I may have to cancel all future speaking engagements because I seriously don’t want to leave my desk now.  🙂