Believe it or not, engineers or developers tend to structure their applications in Visual Studio various ways. For those that are just learning .Net and Visual Studio it is hard to decide where to put things. Hopefully this article will provide some guidance.
Where did I put that file?
So you’ve decided that you want to write an application in .Net. For learning purposes you start adding controls or pages to your application and you are well on your way to making a somewhat usable app. After awhile you start to notice your solution becomes a cluttered mess with files and folders and it becomes hard to remember where you put things. This can be considered both good and bad. You get complete flexibility in one hand and utter chaos in another. Those that are used to other frameworks like Rails or LogiCreate understand you put this here, that here, that there, and this over there named this way or things don’t work. In .Net it is so flexible when starting a project it is hard to get a good sense of where you *should* put things.
If you downloaded 10 projects from http://www.codeplex.com or http://www.sf.net you’ll find 10 different ways of how things are organized. Flexibility is great, but when you are trying to organize your development teams to develop applications so team members can move from project to another this isn’t good. Consistency is the key to productivity. There is guidance on how to structure solutions and projects from the Patterns and Practice team but it is dated I think and doesn’t go the extra deep dive to explain really where / how to structure things. Here are some base line tips to get you thinking about how to organize your projects.
Tip #1: Change Default Options
When you first install Visual Studio, the first thing I do is turn on the feature to always show the solution. I’m not really sure of the reasoning why this is even turned off but you’ll find this settings in the Tools menu:
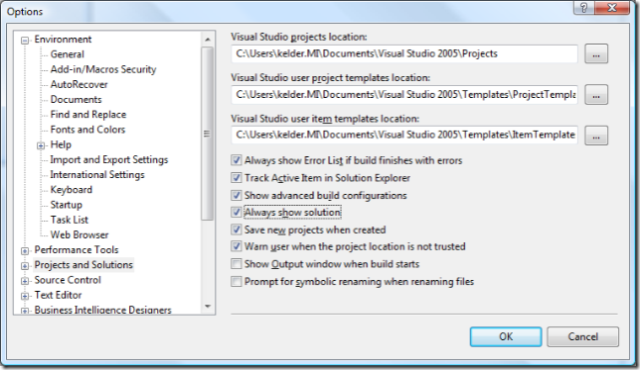
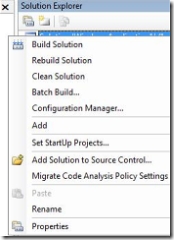
When this is enabled you’ll be able to easily access menus for adding your solution to source control, configuring certain projects to build or not build depending on your needs and another option that is very useful which is Clean Solution. With the solution shown in the projects window here is a snap of that menu when you right click:
Tip #2: Solutions are Deployable Entities
I can’t really stress this enough but to me it is just common sense, yet I see solutions all the time that are made up of multiple projects which are deployed separately. I never mix solutions which have separate deployable projects. For example, if I am building a Smart Client application, the web services used for the Smart Client application will reside in another solution. They may, and can share some of the same common libraries but it doesn’t matter. If I want to work on a web service because I’m changing the business rules or adding a new method, I don’t want to look at everything else, just the items I need.
When you leverage the build feature in Team System, this starts to make more sense since you specify a solution to build. Combine automated builds with automatic push utilities and you start to see where I am headed. The other reason I think of solutions as deployable entities is because different teams or team members may work on various portions. Having separation is good because various teams can work on separate modules and backend services and not have to worry with conflicting solution files in Team System which are hard to resolve.
Tip #3: Folder Structure
This tip is probably the most talked about topic when I speak at various events. Everyone is curious about where or how to name certain things. This is also something I devoted a large amount of time to several years ago to figure out what works and doesn’t work. I understand that what I suggest may not work for every scenario out there, but it does work and has proven itself to be very easy to manage. Even for developers moving from project to project to understand.
Here is a screen shot of a slide that I recently added to one of my presentations which shows how I structure applications on the file system.
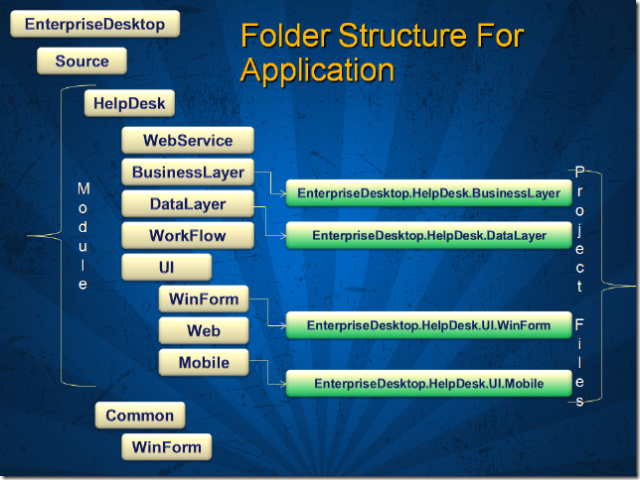
On the file system we have a folder called “EnterpriseDesktop”. This is our folder where the source files will be checked out from Team System. This could be c:\development\EnterpriseDesktop or d:\teamsystem\EnterpriseDesktop depending on where you want to put things. Under this folder we have all the files that belong to our project. The first thing you should notice is everything resides under a folder called “Source”. This is intentional because it allows us take advantage of a feature in Team System easily called “Branching”.
Since our entire application resides in the Source folder, we can easily branch this folder into a future release with new features, ongoing bugs, or multiple branches which would allow us to then merge it back into the main trunk later on. For more information on branching in Team Foundation see this article on Branching and Merging Team Foundation Source Control.
Modules
Underneath the Source folder we see a module called Help Desk outlined. In larger applications, it is easy to break down the application into modules. No matter if your application is a web application, you can still think in terms of modules. Very simply, just think of your features and break down your features into different modules. In some cases you may find this doesn’t work and that is fine. Normally on smaller applications it doesn’t make sense, but if you are building larger ones, it does. Even if you have a smaller application you still can choose to build out an N-Tier architecture with your project in which case this theory still applies.
Tip #4: Modules Are Made Up Of Projects
Modules are simply a collection of sub projects. If we look at just a module as outlined below we see the module is made up of several layers:
- UI
- Data access
- Business
- Workflow
- etc…
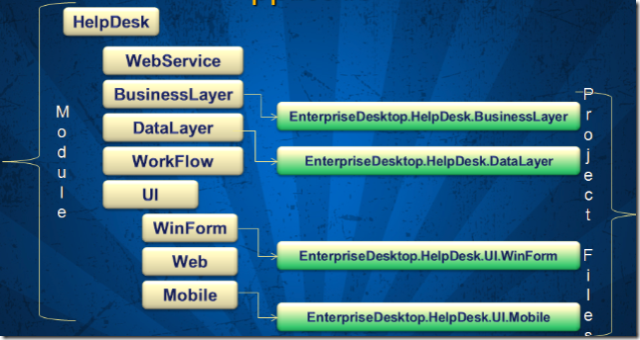
For each layer we create a folder on the file system. In this folder we create our project. Each project folder is green above. Taking this approach aligns our projects according to the namespace we desire since the namespace is derived from the folder hierarchy. Taking this approach means you don’t have to remember to change the namespace setting manually in Visual Studio and since the folder structure inherits or outlines our desired namespace it is easy to understand.
For example let’s say I have a Windows application called EnterpriseDesktop and I want to add a Business layer which holds my business rules. Simply by the way I create the project determines the Namespace of this and the location.
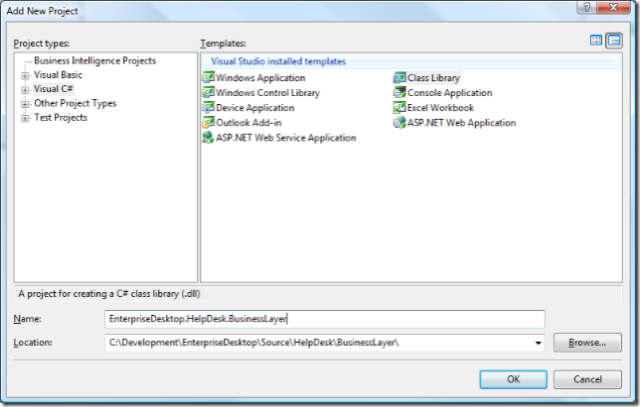
Why did I call the name of the new project I was adding “EnterpriseDesktop.HelpDesk.BusinessLayer”? The reason is because if you look at the folder structure outlined, that is essentially my folder structure and my Namespace. The Name field translates into a Folder. After pressing the OK button your folder structure will look like this:
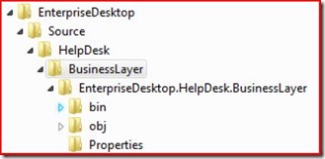
This makes it incredibly easy for developers to understand where files are located, what the Namespaces are etc. For those that revel in Namespaces, it becomes apparent where / how you place things. If you decide to create a namespace like System.Data.SqlClient it becomes apparent where those files are located in the hierarchy if you want to reference just the project for a given namespace.
Question? Why the redundancy in folder names? Wouldn’t I just put the project in the EnterpriseDesktop->Source->HelpDesk->BusinessLayer folder?
Answer: No! The reason is this. What if you decide later on to sub-namespace the business layer or any other one for that matter? You have no place to go then with the pattern. By keeping things separate we don’t run into this problem.
Tip #5: Where do the solution files go?
Since you need to branch the entire source control, the solutions need to go in the root of the Source folder. It is ok to have several solutions if you have different deployable entities. Remember, solutions are for deployable entities. In the case of a web application this might be a console application, windows service, web service or a backend web solution. I typically use this standard for solution files:
ProjectName.DeployableName.Master.sln
In the case of EnterpriseDesktop where we have a user interface and a help desk module, I would have the following solutions in the Source’s root folder:
- EnterpriseDesktop.WinForm.Master.sln
- EnterpriseDesktop.HelpDesk.WebService.Master.sln
Tip #6: Where do I put Third Party Assemblies?
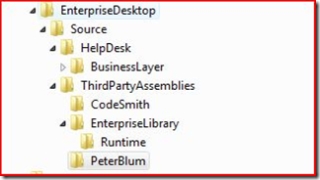
Most applications you build are going to leverage third party assemblies. Either those you download for free or those you may purchase. In the root folder of your source tree, create a folder called ThirdPartyAssemblies. In this folder, nest each of the third party utilities your application leverages.
While this may sound like common sense, I’ve seen projects in Team System or other source control systems which leverage ThirdPartyAssemblies from totally different projects, or even worse, require the developer to install a certain package onto their machine like Enterprise Library. When you checkout your application from source control, you should be able to build right then and there. No additional downloads, installs, or updates from other projects.
If you don’t include your own version of your own assemblies in your source control tree you are looking for trouble. It also complicates ease of use, as well as complicates automating builds. I’ve even seen situations where a developer referenced a third party DLL from another project that was in a totally different source tree and didn’t know why their application broke all of a sudden. The reason was that a newer version of a DLL was replaced that broke their app. Here is a screen shot to outline how I structure this on the file system.
Question? Will this work from machine to machine?
Answer: Yes! The reason is when you add a reference to an assembly in ThirdPartyAssemblies, the solution doesn’t hard code the path, but rather uses a relative path like this: ../../../../ThirdPartyAssemblies/EnterpriseLibrary/RunTime/Microsoft.XXX.XXXX.DLL. This ensures everyone gets the same version of each assembly no matter if they use a C: or a D: or where they place the source code on the file system.
Conclusion
There you have it, the howto guide on setting up your application with Team System and Visual Studio. I understand that not everyone does the same thing the same way, but there is a lot to be gained if we all agreed on a standard. Obviously other projects have agreed and look at what it has done for them. Case in point would be Ruby on Rails.
In the .Net space we do have something on the horizon which may assist us in getting closer to a standard similar to Ruby on Rails but right now it is too early to tell. What I am referring to is the “Guidance Automation Toolkit“. Several Software Factories are currently using this to guide developers on where to place things but it would be nice to see this expanded and become a major feature. The idea behind the toolkit is architects or other developers could create guidance packages which force developers to code in their standard. In other words, if I told Visual Studio that I wanted to create an Enterprise Web Application or Smart Client, decisions would already be made on where UserControls, Forms, Web Services, Documentation and more have to reside in order for my application to function. Today, we see a glimpse of this when using the Smart Client Software Factory or the Web Service Software Factory. I would like to see it expanded though, there is a lot to gain from having standards, not just in code, but structure.
Like this article? 
 My biggest stumbling block to this date running Vista has been my Logitech Orbit camera not having Vista drivers. This camera is expensive ($129) and I use it for work purposes all the time to video conference. This is yet another case of a vendor that needs to get off their rockers and step up. The weird thing is they have drivers for the Logitech Orbit MP model which I don’t have. I called tech support to complain and the tech guy said it was “on the way” but didn’t know when. Reading their documentation it *really* seems they aren’t even going to support the model I have. I understand they want to sell more cameras but this is the wrong way to go about it. Release the driver Logitech or I’m not buying another product of yours for the rest of my life.
  Other than these quirks I’m chugging right along using Vista on a day to day basis. I find myself staring at the weather sidebar gadget throughout the day. It saves me from turning around and looking out my window. Now that is a productivity increase! 🙂 But the main application that doesn’t “feel” like it belongs on my machine is AOL Instant Messenger on Vista (AIM).

