Welcome

You have reached the blog of Keith Elder. Thank you for visiting! Feel free to click the twitter icon to the right and follow me on twitter.

.Net 4.0 – Start Reading Between the Lines – Learn Silverlight and Entity Framework

Posted by Keith Elder | Posted in .Net, Asp.Net, C#, Internet, Mobile Devices, MVP10, PC Software, Smart Clients, SQL Server | Posted on 30-11-2009

11

I started writing this as a general recap of PDC for team members but the more I thought about what was announced at PDC, the longer the email got.  Ultimately I decided to put it out so you dear reader could also gain some insight from things announced at PDC. 

For starters listen to the podcast we recorded with Scott Guthrie or “The Gu”, or “His Guness”, or “ScottGu” about Silverlight 4 announcements among other things while at PDC. 

The big stories out of PDC that I think everyone should take note of are Silverlight 4, Entity Framework 4 and Windows Mobile. Wait Windows Mobile 7? Yes.  Wait… I didn’t hear anything about Windows Mobile 7? Well I didn’t either and that is why this post is called “read between the lines”.  Call it speculation or whatever, but I think I can bring you up to speed on what is about to happen (and no I have no official behind the scenes information, I’m just a guy with a brain).  Before we get to Windows Mobile 7, let’s start with Silverlight.

Silverlight

Silverlight 4 had tons of announcements including:

  • Camera and microphone support
  • Trusted out of browser support.  This means one can access COM (for example, an application could access Outlook APIs)
  • Lots of line of business app controls
  • Added support for drag and drop
  • WCF RIA Services (this is basically what I’m calling the new CSLA, if you listen to the podcast you’ll find out that Rocky worked with the team closely on RIA Services)
  • Print natively
  • More…

Tim has a great recap of all the Silverlight announcements here with links to videos:

http://timheuer.com/blog/archive/2009/11/22/pdc-silverlight-resources-link-dump-learn-silverlight.aspx

Now what does this all mean? It means the line is blurring between client and server applications. It also means we are coming back full circle to “Smart Clients” (which were hot in 2005/2006 but were forgotten due to the Web 2.0 hype.  The only difference is this new breed of application (Silver Clients?) can run directly from a web site, or on a client’s machine.  It also means that Silverlight is going to finally fulfill the vision we heard about a long long time ago that was called WPF/e (WPF Everywhere).  A lot of people have forgotten this but we are seeing it take full shape now.  For businesses that are writing applications internally, I think we are going to start seeing a huge shift away from writing Asp.Net/MVC apps and a move towards the rich model with Silverlight.  I mean seriously, why wouldn’t you? If you get cross platform compatibility, rich data binding, write once and work in any browser, why would developers that are trying to build internal business applications continue to kill themselves writing JavaScript, fighting CSS and browser compatibility?  I can’t think of a reason either.  In my opinion this is just a waste of time (and always has been).  There is something extremely powerful putting a variable in memory and having it be there when you need it without having to worry about sessions, state, etc.  Yes we are FINALLY getting back to the client programming model, just coming at it a different way. 

Entity Framework

Let’s talk about Entity Framework 4.0 for a moment.  This is another big piece of news.  It is big because as .Net developers we will finally have one true way to access data that fits the multitude of ways we have to work.  Here’s a recap of announcements (not a complete list, watch the videos from PDC):

  • POCO – supports plain old clr objects
  • EDM designer enhancements
  • Better stored proc support
  • Model first (then gen database model)

Doug Purdy (who we also interviewed for Deep Fried Bytes while at PDC) has a list of the sessions that cover the Entity Framework 4.0.  Just start at the top and work your way down as far as you can.  At least watch the first video as it shows off all the features of EF.

http://www.douglaspurdy.com/2009/11/22/pdc-2009-data-and-modeling-talks-2/

With the number of features that were announced in EF4 I think we are on the verge of seeing the demise of NHibernate usage by developers in the .Net stack.  For those that have used NHibernate in the past, it is worth another look at the Entity Framework to be released in .Net 4.0.  About the only thing EF4 doesn’t do that NHibernate does do is built-in caching (which hey, there’s this caching thing that AppFabric does, hmm, wonder if they’ll use that? Why not! 🙂 ).  But the big thing to note between EF4 and NHibernate is we are starting to see where this whole modeling thing with OSLO is going (edm files are m fles and so on).  And of course there is the bigger picture of reusing this model in report services, BI and other areas (although we haven’t *seen* that really working yet, it is coming though see next sentence).  As EF4 makes it way into other products throughout the Microsoft ecosystem it is going to be extremely hard to avoid the Entity Framework.  Read between the lines, the writing is on the wall, LEARN THE ENTITY FRAMEWORK.

Just a side bar here because I know someone is going to ask me this at a later time.  Will the Entity Framework kill NHibernate? Answer: Nope I’m not saying that. 

Out of band developers that seem to have a knack for yelling the loudest will continue to use NHibernate but a much larger ecosystem will leverage the out of the box Entity Framework in .Net 4.0.  Think back for just a bit.  History is about to repeat itself all over again.  Remember when we got MSTest and or MSBuild?  Same thing is happening again. There is now an out of the box product for standardizing data access.  Are their alternatives? Sure.  Just as MSTest didn’t kill NUnit or MBUnit and MSBUILD didn’t kill NAnt, EF4 will not kill NHibernate.  However, if you look at the number of developers using MSBuild or MSTest it is high. Extremely high.  Why is that? Answer: pain, ease of use, integration, documentation.  MSTest is not the best testing framework out there (this is a proven fact), but it is good enough for 90% plus test cases.  Entity Framework 4.0 is going to put an ORM in the hands of developers.  And you know what, it doesn’t suck either. 

Windows Mobile 7

And now onto Windows Mobile 7. 

Is this WinMo 7 above?  I honestly don’t know, I found these screen shots on http://windowsphonemix.com/ web site.  BTW, notice that URL?  Mix? Yes Mix.  Mix is the first of the three major conferences Microsoft puts on each year.  The very last slide at PDC during the last keynote said, “Come to Mix 2010 for Windows Mobile 7 futures”.  A lot of people missed this because they were tuned out from the SharePoint demos and already packing to leave.  But there it was on the big screens.  Thus we know Mix is when we’ll see Windows Mobile 7.  Again, listen to the podcast to get some other insight. 

Here’s a quote:  “Three screens and the cloud”

We heard this over and over at PDC.  Let’s read between the lines a bit shall we?

I have three screens:  Windows Desktop, Web, Mobile.  Ok, if I want to write an app that will run on all three what do I as a developer have to do today?  Let’s see, well, we could write a ClickOnce deployed Smart Client for the Desktop that uses WPF.  For the web, well, we would have to switch gears completely and rewrite our app in Asp.Net or Asp.Net MVC to get that screen.  For mobile, even tougher, we have to rewrite the app again to get the mobile version.  Let’s think about this differently again.  Think about it, how many technologies would a developer have to know in order to an application for these three different screens;  WPF, JavaScript, HTML, and CSS will be used just to name a few.

Now, let’s switch gears.  What if I used Silverlight 4 to write my app?  Well, it could work in the browser no doubt.  Hmmm, it could also work on the Desktop using the out of browser experience with elevated permissions.  What about mobile? 

“Wait, didn’t you just say Keith that at Mix we’ll get to see Windows Mobile 7?”

Yes! 

“And hasn’t there already been talk of using Silverlight for mobile?”

Yes!

“Aha! Three screens with Silverlight, I get it!”

That’s right my friendly .Net developers the writing is on the wall. The vision of WPF/e (WPF Everywhere) is about to come true.  We’ve waited for years but it is just around the corner as I predicted would happen years ago.

http://www.keithelder.net/blog/archive/2007/01/12/Microsofts-Response-To-The-iPhone-Is-Right-Around-The-Corner.aspx 

(ok, so it wasn’t right around the corner but 3+ years later)

Moral of the story?

LEARN SILVERLIGHT so you can make millions of dollars building Mobile applications just like the iPhone devs.  There, I just made you rich by putting this puzzle together for you, please send me 20% of all profits.

You are welcome.

New Witty Twitter Published – 2.1.2

Posted by Keith Elder | Posted in Internet, PC Software | Posted on 06-02-2009

0

Get the latest version here:

http://keithelder.net/software/witty/witty.application


New Features

Copy Tweets – This patch submitted by http://twitter.com/chrisroland allows you to highlight text within a Tweet.  The result is the tweet gets copied into your buffer automatically.  The solution isn’t perfect as noted by Jon if you follow the link, but it works. 

Reply Links in @ Replies – Now when you reply to a tweet, it now shows the status you replied to if you visit the web site.  This patch was also submitted by http://twitter.com/chrisroland. He’s on fire!  Here is a screen shot.

image

Reply All – YACRP (yet another Chris Roland patch).  This came in as a feature request from Shawn Wildermuth and it is one that I wanted as well.  Chris got it working and I added it to some additional context menus.  Here is how it works.  Here is a tweet that Matt Brewer just posted this morning and you’ll notice it has two additional names in it, Steve and David. 

image

When pressed, all the @ replies are added to your tweet.  Good stuff!

image

Bugs

There were two bugs that were fixed in this release.  One was a TwitterNet username property bug and the other fixed or tweaked a new feature whereby URLs are automatically shortened.

To get the latest version, click Options->Updates and get the latest.  Thanks to Chris Roland for pumping out these new features.

Witty Twitter 2.1.1 Published

Posted by Keith Elder | Posted in Internet, PC Software | Posted on 04-02-2009

2

A minor update to Witty Twitter was just published, version 2.1.1.  You can install the latest version here:

http://keithelder.net/software/witty/witty.application


This release fixes a bug whereby users with a large number of followers and friends would see old replies and updates.  Here are the official features and fixes in this release:

  • Feature: Compact URLs on the fly – when you paste a URL into the update window it will automatically shrink the URL if it exceeds the 140 character limit  http://bit.ly/xzfSG
  • Feature: Tweets over 140 chars are now automatically split up –  I used this feature in a conversation on twitter yesterday and it is really nice.  http://bit.ly/16yJX
  • Fix: Typing @ results in $1 followed by twitter name http://bit.ly/12JE2
  • Fix: Login window remains visible after first login http://bit.ly/16aSyT
  • Fix:  Witty making too many API calls http://bit.ly/1urU4S

To update Witty, click on Options and the Updates tab and press “Check for Update”.  If you are a first time installer, then just click this link:

http://keithelder.net/software/witty/witty.application

NOTE:

This version doesn’t show 2.1.1 in the window, however if you click on options and updates it should say 2.1.1:

image


Witty Twitter 1.9.0.20 Published

Posted by Keith Elder | Posted in .Net, PC Software | Posted on 20-12-2008

4

Get Latest Version Here:

http://keithelder.net/software/witty/witty.application (requires .Net 3.0 framework)

It has been awhile since I published a version of Witty Twitter.  I was going to push one a month or so ago but new features were not ready for prime time.  This version has a few neat twists in it.  Here is a list of things that were added. 

image

Witty now supports multiple URL services.  TinyUrl is the default, but it also supports Bitly and ISGD.

Another feature added is the ability to filter tweets.  This would have been handy during election time but there are other times you just want to tune out some noise.

image

Another feature is the ability to temporarily ignore a user.  Sure everyone needs More Wally in their life, but there are times when there can be too much Wally.  Right click a user and click “Temporarily Ignore User”.  This will ignore that user for 30 minutes.  Very handy when someone you are following starts to get a little out of hand.

image

Thanks to Jon Galloway for putting most of these features in.  Enjoy.

Setting Up Windows Server 2008 VMWare Virtual Machines For .Net Development

Posted by Keith Elder | Posted in .Net, PC Software, Visual Studio, Windows | Posted on 30-06-2008

45

The Freedom of Virtualization

For awhile now I have been enjoying the freedom of developing with virtual machines.  The biggest advantage it has given me lately is the freedom to do whatever I want to the laptop I use as a workstation.  What I mean by that is I don’t even blink twice if I want to try a new operating system anymore.  Maybe I want to run a version of Debian Linux or Ubuntu to keep my Unix skills polished up.   Or maybe I want to try running a 64bit version of Windows Server as my main operating system to see if all of my hardware works.  To consider doing this previously without virtualization would be almost unthinkable because of the amount of time it would take to get everything back up and running. 

All of this freedom of choice is made possible through virtualization, specifically with VMWare Workstation.  VMware runs on a variety of operating systems including Windows, Linux and Mac.  Once my operating system is installed along with the needed vitalization tools I can literally go back to work by just starting up a virtual machine where all of my tools are stored.  Compared to setting up a full blown development machine this is huge.  Not only that but virtualization allows developers like myself to try out alphas, CTPs, betas and more without harming the main development operating system.  This ability to test software is made possible through cloning and what is called snapshots within VMWare. 

I’m writing this article about virtualization for two reasons.  One because I’ve spent a lot of time tweaking my setup and I wanted to document it.  And two, I know there are others that can benefit from this information as well.  In this article I’m going to cover setting up a VM (virtual machine) from scratch.  Then how to configure the operating system specifically for development in VMWare.  The purpose of this setup is to configure Windows Server 2008 as a development platform using VMWare.  Let’s get going!

Creating Your Base Virtual Machine

When starting from scratch I always create what I call a base virtual machine (VM).  This VM serves as my base image for all of my needs and will be re-used for various setups.  There are few things you need to keep in mind when you create a base image.  I’ll mark these as we go along in the screen shots below.  For posterity sakes, note that I’m using VMWare Workstation 6. 

Once VMWare Workstation is installed click File->New Virtual Machine.

image

image

image

Although VMWare supports Server 2008 as “experimental” I’ve found that choosing Windows Vista works just as well.  Once 2008 support is fully supported in a future release of Workstation this will not be hard to change.

image

You’ll notice below that I’m storing this VM on the F:\ drive not the C:\ drive.  To really get performance out of your virtual machines you need to separate them onto a different spindle or disk.  I use an external Western Digital 500GB MyBook which has a 7200RPM hard drive.  When I travel I sync my virtual machines with my portable 250GB passport drive.  This allows me to use a faster disk when I’m in the office which provides more speed and also provides a backup of the virtual machines. 

image

image

I have 4GBs of memory in my laptop of which 3.3GB is really accessible.  While I could give the VM 2GB of memory, I find that sticking between 1-1.5GB of memory seems to be the sweet spot.  If you use too much it slows the host machine down.

image

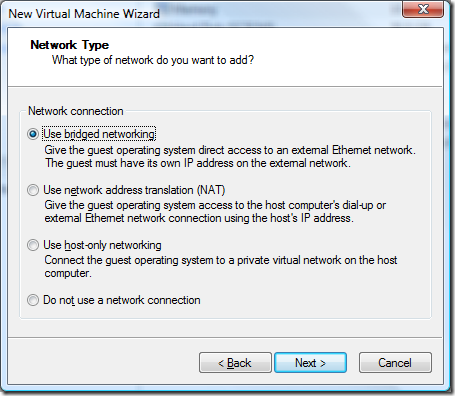
For networking I use bridge networking for some VMs and NAT for others.  As you’ll see later on I will create two different setups from this base image.  One will be for work, the other for presentations and speaking.  For work I use a bridge network since this allows me to separate the VPN connection from my host machine completely.  While I’m at home this allows me to access my local area network from my host machine (printers, home server, file storage, backups, etc).  For the other VM I use NAT.

image

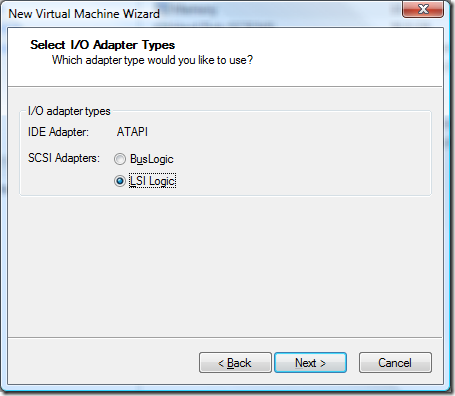
Doing some reading and research the LSI Logic I/O adapter is supposedly the faster choice for SCSI adapters.

image

image

image

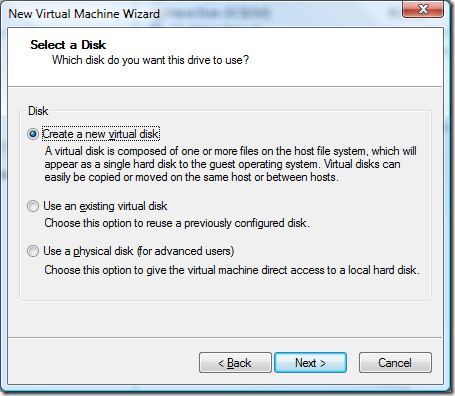
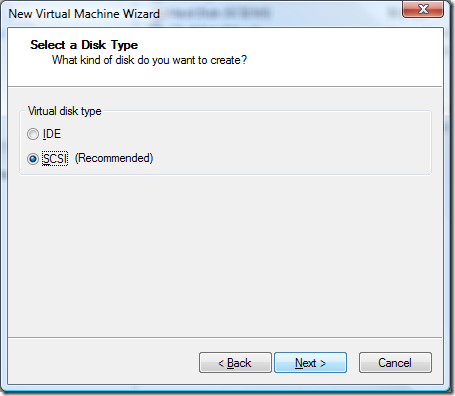
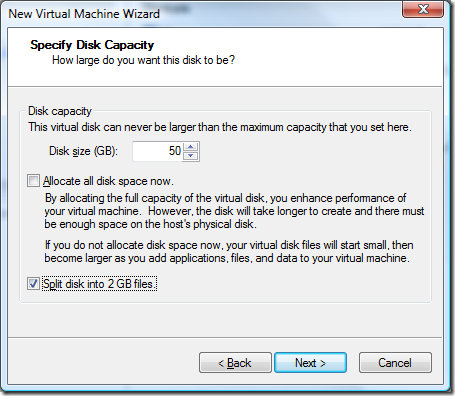
Disk capacity is something you really need to think about before setting this option.  I made the mistake of setting up a complete VM environment only to realize I needed more space.  While virtual machines can be resized using the disk manager utility, they cannot be resized if there are clones or snapshots tied to the VM.  For me this meant I had to blow away a lot of my work and go back to my base images (which is another reason why I do full cloning to start with as you’ll see later on). 

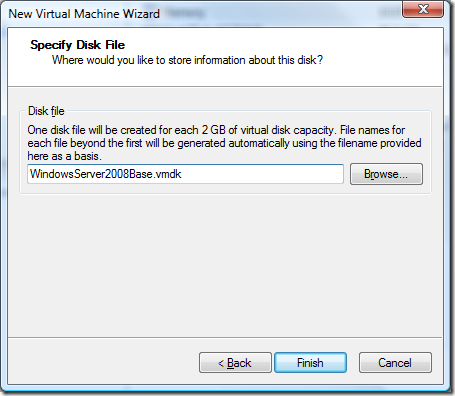
You’ll notice I didn’t choose “Allocate all disk space now”.  Essentially what this does is it reserves all of your hard drive space for your VM.  Think of it like formatting your VM image files.  As noted there is a performance gain.  However, this also means you are going to take up as much disk space as you enter in the field below.  In my case if this was checked, I’d eat up 50GB of disk space on the drive.  Not fun, especially when cloning full images (50GB + 50GB + 50GB).  Thus I do not check this option. I do however split the files into 2GB files.  The main reason is for defragmentation.  If you have one large image file you need twice the amount of space to defrag it.  With 2GB files you’ll only need an additional 2GB of space.

image

image

That’s my notes or tips for setting up a base virtual machine.  After the virtual machine is setup be sure to check your settings and configure your monitors and other peripherals.

Setting Up Windows Server 2008 for VMWare Workstation

Once you get your settings tweaked launch the VM and get the Windows startup started.  I like using server as my development operating system (OS) because it is tuned for speed unlike Vista.  There is a big difference in developing on Vista and Server 2008.  Even comparing XP and Server 2003 there was a huge speed difference.  A lot of things are turned off in server that are enabled in Vista and this is what contributes to its speed.  This setup will walk through how to configure Server as a workstation along with some specific VMWare things you need to do as well. 

image

Once the operating system is installed, follow these simple steps to prepare the image.

Step 1 – Tools

The very first thing you need to do after the OS boots up is install VMWare Tools.  This will provide drivers for the OS to run smoother and help you keep your sanity.  Things like the mouse jumping around randomly for no apparent reason will be fixed once this is installed.  After installed, reboot.

Step 2 – Updates

Check for updates.  This is pretty much something you need to do on any operating system you install.   Install the updates and reboot. Note: at the time of this article there are 9 updates for Server 2008.

image

Step 3 – Time Zone


Using the “Initial Configuration Tasks” screen which should be on the screen after the reboot there are a few things you need to do.  For starters check your time zone.  Review the other options while you are in there and make sure your computer name is setup the way you want and other things.

image

Step 4 – Shutdown Tracker

If you are familiar with Server you know it annoyingly asks you why it was restarted after it reboots.  While this might be handy for *real* servers for a workstation used for development it is just annoying.  To disable this open Start->Run->gpedit.msc.  Find the “Display Shutdown Event Tracker” as shown below, right click properties and disable it. 
image

Step 5 – IE Security

In order to use Server 2008 as a workstation within your VM you will need to remove the baked in security settings for IE.  From within Server Manager as show here select “Configure IE ESC”.

image

Set both settings to OFF.

image

Reboot.

Step 6 – Features

Within Server Manager you will also need to enable all the features you want. 

image

Here are the options I enable since I know this image is going to be primarily used for .Net development.

  • .NET Framework 3.0
  • Desktop Experience – This includes eye candy features from Vista as well as allows you to support the Vista Themes (we’ll enable this later on).
  • Remote Assistance
  • Powershell
  • Windows Process Activation Service

In the next screen you’ll be asked to configure IIS.  I always select a  minimal setup but feel free to select what you know you will need.

image

Restart to complete installation.

Step 7 – Roles

In order to get fast file searching and other features you’ll need to turn on the role for File Services as shown here.

image

image

Since this is running in a VM depending on your usage you *could* leave this off.  I am basically going to be working day in and day out from this image so having the ability to search and find emails and files quickly is important.

Step 7 – Registry Settings (optional)

Open the registry editor by doing Start->Run->regedit

Add the following keys:

HKEY_LOCAL_MACHINE\SYSTEM\CurrentControlSet\Control\Session Manager\Memory Management\PrefetchParameters

Add a new DWORD by the name of EnablePrefetcher and assign is the value of 3
Add a new DWORD by the name of EnableSuperfetch and assign is the value of 3

image

What does this do?  It enables Windows to learn which programs you use so it can pre-load those applications before you run then.  It is a feature that was added in Vista.  You can also skip this step if you feel there is no value in this feature but it is *suppose* to speed things up down the road.

Step 8 – Services

There are several services we need to enable to get Server 2008 to behave more like a workstation.  These are disabled by default.

Within Server Manager select Configuration->Services.  Or you can do Start->Run-Services.msc. 

Enable the following services:

  1. Themes
  2. SuperFetch (only if you enabled the registry setting above)
  3. Windows Audio
  4. Windows Audio Endpoint Builder

Step 9 (optional) – Make it pretty

Totally optional and something you may or may not want to enable since this is running in a VM.  I’ve found that things are still pretty snappy but you may want to see how your mileage varies.  Right click on the desktop and select Theme.  Choose the Vista Theme in the drop down to get a Vista look and feel for your virtual machine.

Before:

image

After:

image

Step 10 – Setup Sound

When you install Server 2008 you’ll notice that sound doesn’t work.  Vista does the same thing so this will work in either case.  In order to get sound to work you have to install the Creative Labs PCI sound driver.  It is a pita to find so I am attaching it to this article so I can easily find it down the road as well as to ease your setup pains.

Download Sound Driver: Create Labs Driver

Step 11 – Activate Windows

We are going to be in the control panel tweaking some things next.  While we are here, go ahead and activate Windows.  Nothing is worse than forgetting to do this, then having to do it on every clone or snapshot down the line as you build up your VMs.

image

Note:  If you are using a MSDN License, you will get a DNS error code while trying to activate after installing Windows.  This is because you need to change the product key and enter your *real* product key.

Step 12 – Performance Settings

Adjust the processor scheduling which is in Control Panel->System->Advanced Settings->Advanced.

image

In the next tab, turn on DEP.

image

Step 13 – Defragment

In order to make this the fastest VM we can, we need to defrag the drive.  Defragmenting the VM is the key to keeping things fast. 

 image

After I install a big product like Office, or Visual Studio I defrag the drive.  Also remember to defrag the drive the virtual machine is running from!  The more you defrag, the more performance you’ll get out of your VMs.

Step 14 – VM Optimizations

I’m not a VMWare expert but there are a few things I have found out that work well.  For one since I/O is important because the VMs will be run from an external drive, I disable page sharing.  Add this line to your .VMX configuration file.

sched.mem.pshare.enable = “FALSE”

Another option is memory trimming which doesn’t eat up host memory and then give it back when it needs it.

MemTrimRate = 0

Step 15 – Setup Your User Account

We’ve been logged into the VM as Administrator up until this point.  We need to create an account that we will use to login with and do work.  We want to create this account now because we want to set our desktop settings once and then each VM we clone from this base image we’ll already have everything setup.  Create your account in the control panel, I suggest setting the account as an administrator.  Once the account is created, log out of the administrator account and then setup that account.

Step 16 – Shrink Disk

Before moving forward we need to shrink our VM disk.  This reclaims unused space on the drive.  Note, we cannot shrink a disk if it has been cloned or has a snapshot.  We also can’t shrink a disk that has been pre-allocated.  If you followed the steps up to this point, none of this should be a concern.  There are several steps.  The first is VMWare tools prepares the image and then the second is where Workstation performs the actual shrinking.  Remember to defrag everything first!

To shrink the disk go into Control Panel->VMWare Tools.  Select the shrink tab and press the “Prepare to shrink” button.  Then wait.

image

Once this process finishes you will be prompted with this dialog.  Click yes to begin the process.

image

image

At this point we have a clean VM image to build other virtual machines from.  It has all the updates applied to it, is configured for workstation use, is defragged and has been shrunk.  The only thing in this virtual machine is the operating system.  This is what I call the base image.  Note:  My base image is 6.1GB after it has been shrunk.

Step 17 – Create Full Clone

Now that you have this image setup.  Create a full clone of it.  Using the clone, add your development tools like Visual Studio, SQL Server, etc.

UPnP Tip

If you are running Server 2008 on a private network and want to connect to UPnP devices and see them via network discovery then see this post which enables that.


Strategy For Cloning Virtual Machines

Once I get through the process above I split this base image off into two full clones.  It takes a long time to get this base image setup thus it isn’t something one wants to repeat often.  By using  a feature of VMWare Workstation called cloning we can create an exact clone of this base image to build other images. 

What I do is create two full clones of this base image.  I use one for work since it has to be bound to the domain.  The other I use for installing various pieces of software for personal use and for speaking engagements. 

For the VM at work I create one called work base.  This image will serve as my base image that I will install VPN software, Office 2007 and a few other utilities needed for work.  Once I get this image setup I create another clone of it that is a linked clone.  In this clone I install all of my development tools.  This gives me a hard restore / starting point where I can install or test software without development tools.  The reason I do all of this is it allows me to go back to points in time and try something different out without having to build everything from scratch.  For example let’s say a new version of Visual Studio comes out I need to test or something like that.  To play with that type of software it is important to start from a fairly clean machine.  Here is a chart I put together to show how I layout my virtual machines.

image

You’ll notice there are no snapshots listed above (another feature VMWare supports).  Snapshots are really meant for temporary use, not to run for long periods of time.  This setup gives me really good flexibility.  At least to the point to where I haven’t needed to alter it much at all.  That’s pretty much it.  Once this setup is done I don’t touch the “Server Base” image except to start it up occasionally to apply updates.  The only thing I use it for moving forward is for cloning so I have an optimized image to start with no matter the scenario.

I hope this helps someone out.  I know I wish I’d had something like this to refer to when I started out playing with virtualization images for development.  As I find new tricks or things I’m sure I’ll update this over time thus I consider this article a moving target.  One thing that is for sure is the way you do things today will not be the way you do things tomorrow.  If you haven’t explored virtualizing your development give it a try.  Here are some Words of Wisdom ‘ll leave you with:

“When you virtualize your development or main body of work, it doesn’t matter which operating system you run to host it.” – The Elder